 Kia Forte: Audio Unit Removal
Second generation YD (2014-2018) / Kia Forte TD 2014-2018 Service Manual / Body Electrical System / Audio / Audio Unit Removal
|

| 1. |
Disconncet the negative (-) battery terminal.
|
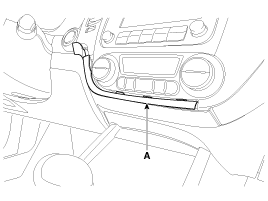
| 2. |
Using a screwdriver or remover, remove the center fascia garnish
(A).
|
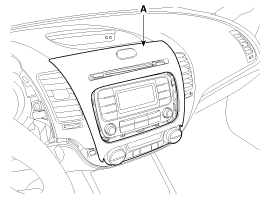
| 3. |
Using a screwdriver or remover, remove the center fascia panel
(A).
|
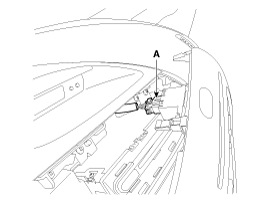
| 4. |
Remove the center fascia panel after disconnecting the hazard
switch connector (A).
|
| 5. |
Remove the audio head unit (A) after loosening the mounting screws
(4EA).
|
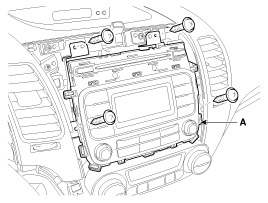
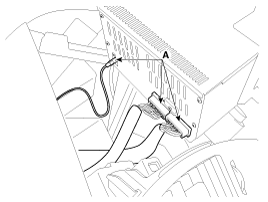
| 6. |
Disconnect the connectors and cable (A) from the audio head unit.
|
 Audio Unit Components
Connector Pin Information
No.
Connector A
Connector B
1
Rear left speaker (+)
-
2
Front left speaker (+)
-
...
 Audio Unit Installation
1.
Connect the audio unit connectors and cables.
2.
Install the audio unit.
3.
Install the center fascia panel ...
See also:
Engine Oil Oil And Filter Replacement
ŌĆó
Prolonged and repeated contact with mineral oil will result
in the removal of natura ...
Sunroof open warning (if equipped)
If the driver removes the ignition key (smart key: turns off the engine) and
opens the driver-side door when the sunroof is not fully closed, the warning chime
will sound for a few seconds and a ...
Categories
- Home
- Kia Forte BD 2019-2026 Owners Manual
- Kia Forte BD 2019-2026 Service Manual
- First Generation
- Second generation
- Kia Forte TD 2014-2018 Owners Manual
- Kia Forte TD 2014-2018 Service Manual

Copyright ® www.kifomanual.com 2014-2026