 Kia Forte: Center Fascia Panel Replacement
Second generation YD (2014-2018) / Kia Forte TD 2014-2018 Service Manual / Body (Interior and Exterior) / Crash Pad / Center Fascia Panel Replacement
|

|

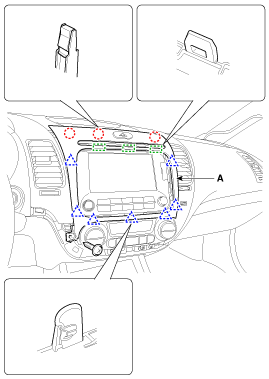
| 1. |
Using a screwdriver or remover, remove the center garnish [LH]
(A).
|

| 2. |
After loosening the mounting screw, then remove the center fascia
panel (A).
|
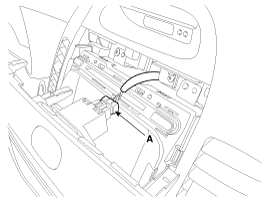
| 3. |
Disconnect the hazard switch connector (A).
|
| 4. |
Install in the reverse order of removal.
|

 Center Fascia Panel Component Location
1. Center fascia panel
...
 Crash Pad Upper Panel Component Location
1. Crash pad upper panel
...
See also:
Injector Installation
ŌĆó
Install the component with the specified torques.
ŌĆó
...
Hood switch Description
The hood switch is included as the influencing factors in the calculation
of the ISG function. If the hood is open, the engine must not be started or
stopped by the ISG function for safety re ...
Timing Chain Installation
1.
Check that the TDC marks on the intake and exhaust CVVT sprockets
are slightly turned (about 2 to 3 teeth) from the TDC position after
the timing chain has been rem ...
Categories
- Home
- Kia Forte BD 2019-2026 Owners Manual
- Kia Forte BD 2019-2026 Service Manual
- First Generation
- Second generation
- Kia Forte TD 2014-2018 Owners Manual
- Kia Forte TD 2014-2018 Service Manual

Copyright ® www.kifomanual.com 2014-2026