 Kia Forte: Rear Pillar Trim Replacement
| ŌĆó
|
Put on gloves to protect your hands.
|
|
| ŌĆó
|
When prying with a flat-tip screwdriver, wrap it with
protective tape, and apply protective tape around the related
parts, to prevent damage.
|
| ŌĆó
|
Use a plastic panel removal tool to remove interior trim
pieces to protect from marring the surface.
|
| ŌĆó
|
Take care not to bend or scratch the trim and panels.
|
|
|
1. |
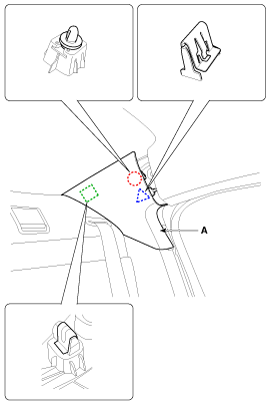
Using a screwdriver or remover, remove the rear pillar trim (A).

|
|
2. |
Install in the reverse order of removal.
|
ŌĆó |
Replace any damaged clips.
|
|
|
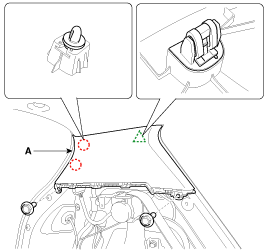
(5Door)
| ŌĆó
|
Put on gloves to protect your hands.
|
|
| ŌĆó
|
When prying with a flat-tip screwdriver, wrap it with
protective tape, and apply protective tape around the related
parts, to prevent damage.
|
| ŌĆó
|
Use a plastic panel removal tool to remove interior trim
pieces to protect from marring the surface.
|
| ŌĆó
|
Take care not to bend or scratch the trim and panels.
|
|
|
1. |
Remove the rear wheel house trim.
(Refer to Interior Trim - "Rear Wheel House Trim")
|
|
2. |
After loosening the mounting bolts, then remove the rear pillar
trim (A).

|
|
3. |
Install in the reverse order of removal.
|
ŌĆó |
Replace any damaged clips.
|
|
|
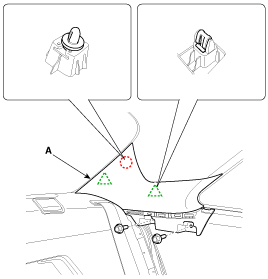
(2Door)
| ŌĆó
|
Put on gloves to protect your hands.
|
|
| ŌĆó
|
When prying with a flat-tip screwdriver, wrap it with
protective tape, and apply protective tape around the related
parts, to prevent damage.
|
| ŌĆó
|
Use a plastic panel removal tool to remove interior trim
pieces to protect from marring the surface.
|
| ŌĆó
|
Take care not to bend or scratch the trim and panels.
|
|
|
1. |
Remove the rear inner outer trim.
(Refer to Interior Trim - "Center Pillar Trim")
|
|
2. |
After loosening the mounting bolts, then remove the rear pillar
trim (A) by using a screw driver.

|
|
3. |
Install in the reverse order of removal.
|
ŌĆó |
Replace any damaged clips.
|
|
|
(4Door)
1. Rear pillar trim
(5Door)
1. Rear pillar trim
(2Door)
1. Rear pillar trim
...
(4Door)
1. Rear wheel house trim
(5Door)
1. Rear wheel house trim
...
See also:
Circuit Diagram (1)
...
Special Service Tools
Tool(Number and Name)
Illustration
Use
Deployment tool
0957A-34100A
Airbag deployment tool.
Deployment adapter
0957A-3Q100
...
Room lamp
To turn the room lamp ON or OFF, push the switch.
If your vehicle is not equipped with a map lamp, the room lamp will also turn
on or off as follows.
The room lamp comes on when a door is opene ...
 Kia Forte: Rear Pillar Trim Replacement
 Rear Pillar Trim Component Location
 Rear Wheel House Trim Component Location


