 Kia Forte: Audio Unit Removal
Second generation YD (2014-2018) / Kia Forte TD 2014-2018 Service Manual / Body Electrical System / Audio / Audio Unit Removal
|
| 1. |
Disconncet the negative (-) battery terminal.
|
| 2. |
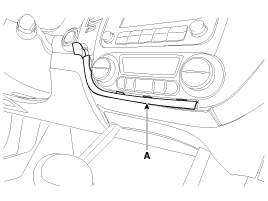
Using a screwdriver or remover, remove the center fascia garnish
(A).
|
| 3. |
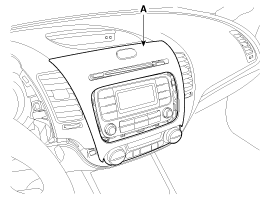
Using a screwdriver or remover, remove the center fascia panel
(A).
|
| 4. |
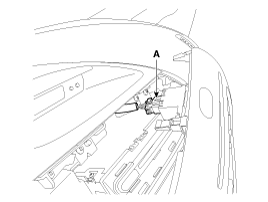
Remove the center fascia panel after disconnecting the hazard
switch connector (A).
|
| 5. |
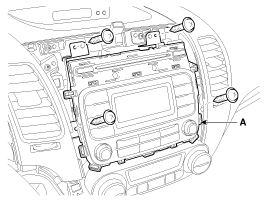
Remove the audio head unit (A) after loosening the mounting screws
(4EA).
|
| 6. |
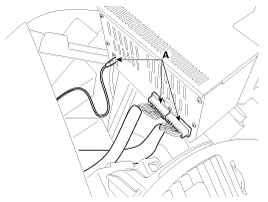
Disconnect the connectors and cable (A) from the audio head unit.
|
 Audio Unit Components
Connector Pin Information
No.
Connector A
Connector B
1
Rear left speaker (+)
-
2
Front left speaker (+)
-
...
 Audio Unit Installation
1.
Connect the audio unit connectors and cables.
2.
Install the audio unit.
3.
Install the center fascia panel ...
See also:
Fuel Economy
Range
The range is the estimated distance the vehicle can be driven with the remaining
fuel.
Distance range : 30 ~ 9999 mi or 50 ~ 9999 km.
If the estimated distance is below 30 mi. (50 km), t ...
ECM Terminal And Input/Output signal (M/T)
ECM Terminal Function
Connector [CNG-MA]
Pin No.
Description
Connected to
1
Ignition Coil (Cylinder #1) control output
Ignition Co ...
Steering wheel
Electric power steering (EPS) Power steering uses the motor to assist you in
steering the vehicle. If the engine is off or if the power steering system becomes
inoperative, the vehicle may still be ...
Copyright ® www.kifomanual.com 2014-2025


