 Kia Forte: Power Door Lock Actuators Inspection
Second generation YD (2014-2018) / Kia Forte TD 2014-2018 Service Manual / Body Electrical System / Power Door Locks / Power Door Lock Actuators Inspection
Front Door Lock Module Inspection
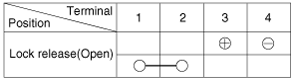
| 1. |
Remove the front door trim.
(Refer to Body - "Front Door Trim")
|
| 2. |
Remove the front door module.
(Refer to Body - "Front Door Module")
|
| 3. |
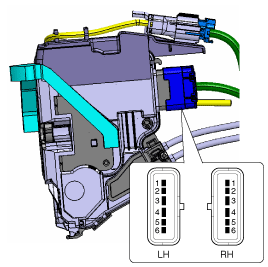
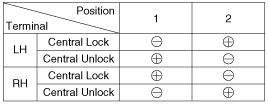
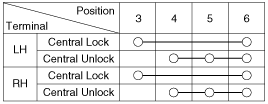
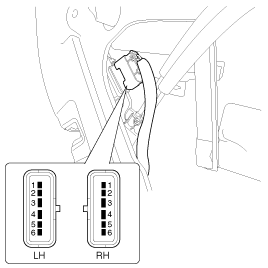
Disconnect the connector from the actuator.
|
| 4. |
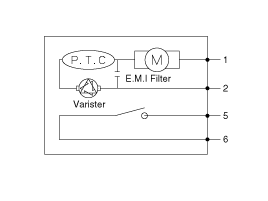
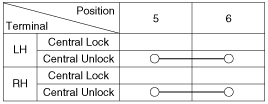
Check actuator operation by connecting power and ground according
to the table. To prevent damage to the actuator, apply battery voltage
only momentarily.
|

Rear Door Lock Module Inspection
| 1. |
Remove the rear door trim.
(Refer to Body - "Rear Door Trim")
|
| 2. |
Remove the rear door module.
(Refer to Body - "Rear Door Module")
|
| 3. |
Disconnect the connector from the actuator.
|
| 4. |
Check actuator operation by connecting power and ground according
to the table. To prevent damage to the actuator, apply battery voltage
only momentarily.
|
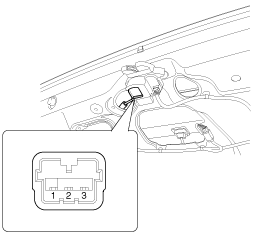
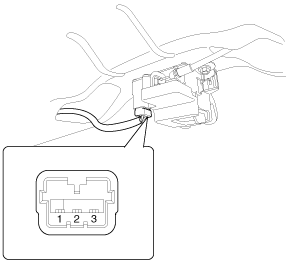
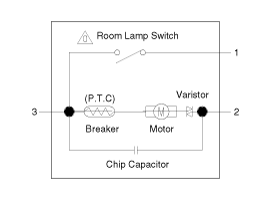
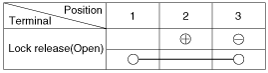
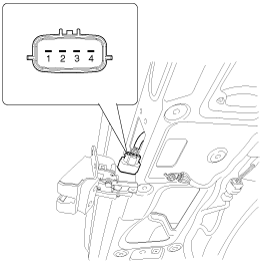
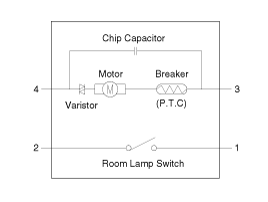
Trunk Lid / Tailgate Release Module Inspection
| [2/4 Door] |
| 1. |
Remove the trunk lid trim.
(Refer to Body - "Trunk Lid Trim")
|
| 2. |
Disconnect the connector from the actuator.
[2 Door]
[4 Door]
|
| 3. |
Check actuator operation by connecting power and ground according
to the table. To prevent damage to the actuator, apply battery voltage
only momentarily.
|
| [5 Door] |
| 1. |
Remove the tailgate trim.
(Refer to Body - "Tailgate Trim")
|
| 2. |
Disconnect the connector from the actuator.
|
| 3. |
Check actuator operation by connecting power and ground according
to the table. To prevent damage to the actuator, apply battery voltage
only momentarily.
|
 Component Location
1. Driver power window switch
2. Door lock switch (Driver)
3. Passenger power window switch
4. Door lock switch (Passenger)
5. BCM (Body Control Module)
6. Front door loc ...
 Power Door Lock Relay Inspection
Diagnosis With GDS
1.
It will be able to diagnose defects of power door lock with GDS
quickly. GDS can operates actuator forcefully, input/output value monitoring
...
See also:
Output Speed Sensor Signal Waveform
Fig 1) Input/Output speed sensor at low speed
Fig 2) Input/Output speed sensor at high speed ...
If you have a flat tire (If equipped)
Jack and tools
The spare tire, jack, jack handle and wheel lug nut wrench are stored in the
luggage compartment.
Remove the luggage under tray out of the way to reach the equipment.
(1) Jack h ...
Muffler Removal and Installation
Front Muffler
1.
Detach the rubber hanger (A) from the front muffler.
2.
Remove the front muffler (B).
Tightening ...
Categories
- Home
- Kia Forte BD 2019-2026 Owners Manual
- Kia Forte BD 2019-2026 Service Manual
- First Generation
- Second generation
- Kia Forte TD 2014-2018 Owners Manual
- Kia Forte TD 2014-2018 Service Manual

Copyright ® www.kifomanual.com 2014-2026