 Kia Forte: Crankshaft Damper Pulley Removal and Installation
Second generation YD (2014-2018) / Kia Forte TD 2014-2018 Service Manual / Engine Mechanical System / Timing System / Crankshaft Damper Pulley Removal and Installation
| 1. |
Remove the RH front wheel.
|
| 2. |
Remove the drive belt.
(Refer to Timing System - "Drive Belt")
|
| 3. |
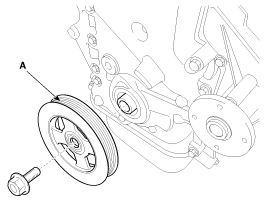
Remove the crankshaft damper pulley (A).
|
| 4. |
Install in the reverse order of removal.
|
 Crankshaft Damper Pulley Components
1. Crankshaft damper pulley
...
 Crankshaft Damper Pulley Inspection
Check the crankshaft damper pulley for vibration in rotation, oil dust
deposit of V-ribbed part. Replace if necessary. ...
See also:
Electric Oil Pump Installation
1.
Install in the reverse of removal.
...
Torque Converter Control Solenoid Valve (T/CON_VFS) Removal
1.
Disconnect the negative (-) battery cable.
2.
Remove the air cleaner assembly and air duct.
(Refer to Engine Mechanical System - &qu ...
Installation
1.
Install in the reverse order of removal.
2.
After be equipped, perform bleeding air procedure in clutch release
cylinder after pouring t ...
Copyright © www.kifomanual.com 2014-2025

