 Kia Forte: Rolling code programming
To train a garage door opener (or other rolling code equipped devices) with the rolling code feature, follow these instructions after completing the "Programming" portion of this text. (A second person may make the following training procedures quicker & easier.)
4. Locate the "learn" or "smart" button on the deviceâs motor head unit. Exact location and color of the button may vary by product brand. If there is difficulty locating the "learn" or "smart" button, reference the deviceâs ownerâs manual or contact HomelinkÂź at 1-800- 355-3515 or on the internet at www.homelink.com.
5. Press and release the "learn" or "smart" button on the deviceâs motor head unit.You have 30 seconds to complete step number 6.
6. Return to the vehicle and firmly press and release the programmed HomelinkÂź button up to three times. The rolling code equipped device should now recognize the HomelinkÂź signal and activate when the HomelinkÂź button is pressed. The remaining two buttons may now be programmed if this has not previously been done. Refer to the "Programming" portion of this text.
Operating HomelinkÂź
To operate, simply press the programmed HomelinkÂź button.
Activation will now occur for the trained product (garage door, security system, entry door lock, estate gate, or home or office lighting). For convenience, the hand-held transmitter of the device may also be used at any time. The HomelinkÂź Wireless Controls System (once programmed) or the original hand-held transmitter may be used to activate the device (e.g. garage door, entry door lock, etc.). In the event that there are still programming difficulties, contact HomelinkÂź at 1-800-355-3515 or on the internet at www.homelink.com.
Erasing programmed HomelinkÂź buttons
To erase the three programmed buttons (individual buttons cannot be erased):
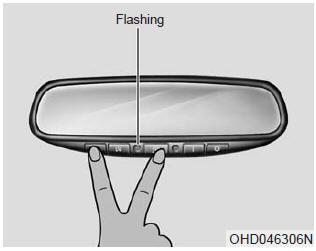
Press and hold the left and center buttons simultaneously, until the indicator light begins to flash (approximately 20 seconds).
Release both buttons. Do not hold for longer than 30 seconds. HomelinkÂź is now in the train (or learning) mode and can be programmed at any time.
Reprogramming a single HomelinkÂź button
To program a device to HomelinkÂź using a HomelinkÂź button previously trained, follow these steps:
1. Press and hold the desired HomelinkÂź button. Do NOT release until step 4 has been completed.
2. When the indicator light begins to flash slowly (after 20 seconds), position the hand-held transmitter 1 to 3 inches away from the HomelinkÂź surface.
3. Press and hold the hand-held transmitter button (or press and "cycle" - as described in "Canadian Programming" above).
4. The HomelinkÂź indicator light will flash, first slowly and then rapidly. When the indicator light begins to flash rapidly, release both buttons.
The previous device has now been erased and the new device can be activated by pushing the HomelinkÂź button that has just been programmed. This procedure will not affect any other programmed HomelinkÂź buttons.
Gate operator programming & canadian programming
During programming, your hand-held transmitter may automatically stop transmitting. Continue to press and hold the HomelinkÂź button (note steps 2 through 4 in the "Programming" portion of this text) while you press and re-press ("cycle") your handheld transmitter every two seconds until the frequency signal has been learned. The indicator light will flash slowly and then rapidly after several seconds upon OHD046306N successful training.
Accessories
If you would like additional information on the HomelinkÂź Wireless Control System, HomelinkÂź compatible products, or to purchase other accessories such as the HomeLinkÂź Lighting Package, please contact HomelinkÂź at 1-800-355-3515 or on the internet at www.homelink.com.
This device complies with Part 15 of the FCC rules.
Operation is subject to the following two conditions:
1. This device may not cause harmful interference, and
2. This device must accept any interference received, including interference that may cause undesired operation.
WARNING
The HomeLinkÂź transmitter has been tested and complies with FCC and DOC/MDC rules. Changes or modifications not expressly approved by the party responsible for compliance could void the userâs authority to operate the equipment. IC: 4112104541A Gentex MODEL/FCC ID: NZLSTDHL3
Outside rearview mirror
Be sure to adjust mirror angles before driving.
Your vehicle is equipped with both left-hand and right-hand outside rearview mirrors. The mirrors can be adjusted remotely with the remote switch (if equipped). The mirror heads can be folded to prevent damage during an automatic car wash or when passing through a narrow street.
The right outside rearview mirror is convex. Objects seen in the mirror are closer than they appear.
Use your interior rearview mirror or direct observation to determine the actual distance of following vehicles when changing lanes.
CAUTION - Rearview mirror
Do not scrape ice off the mirror face; this may damage the surface of the glass. If ice should restrict movement of the mirror, do not force the mirror for adjustment. To remove ice, use a deicer spray, or a sponge or soft cloth with very warm water.
WARNING - Mirror adjustment
Do not adjust or fold the outside rearview mirrors while the vehicle is moving. This could result in loss of control.
Remote control
Electric type
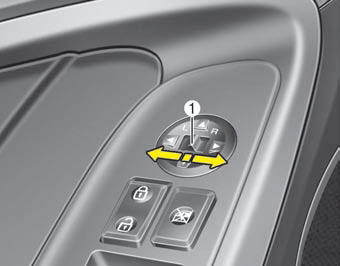
The electric remote control mirror switch allows you to adjust the position of the left and right outside rearview mirrors. To adjust the position of either mirror the ignition switch should be in the ACC or ON position.
Move the lever (1) to R or L to select the right side mirror or the left side mirror, then press a corresponding point on the mirror adjustment control to position the selected mirror up, down, left or right.
After the adjustment, put the lever into neutral (center) position to prevent inadvertent adjustment.
CAUTION - Outside mirror
- The mirrors stop moving when they reach the maximum adjusting angles, but the motor continues to operate while the switch is pressed. Do not press the switch longer than necessary, the motor may be damaged.
- Do not attempt to adjust the outside rearview mirror by hand. Doing so may damage the parts.
Folding the outside rearview mirror
Electric type
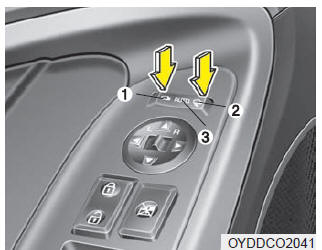
The outside rearview mirror can be folded or unfolded by pressing the switch as below.
Left (1) :
The mirror will unfold.
Right (2) :
The mirror will fold.
Center (AUTO, 3) :
The mirror will fold or unfold automatically as follows:
Without smart key system The mirror will fold or unfold when the door is locked or unlocked by the transmitter.
With smart key system The mirror will fold or unfold when the door is locked or unlocked by the smart key. The mirror will fold or unfold when the door is locked or unlocked by the button on the outside door handle. The mirror will unfold when you approach the vehicle (all doors closed and locked) with a smart key in possession. (if equipped)
CAUTION - Electric type outside rearview mirror
The electric type outside rearview mirror operates even though the ignition switch is in the OFF position. However, to prevent unnecessary battery discharge, do not adjust the mirrors longer than necessary while the engine is not running. Do not attempt to fold the electric type outside rearview mirror by hand because doing so could cause motor damage or failure.
Manual type
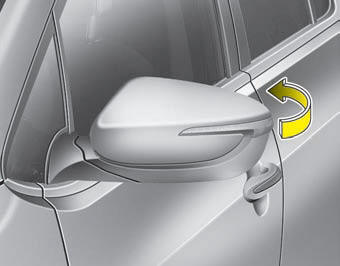
To fold outside rearview mirror, grasp the housing of mirror and then fold it toward the rear of the vehicle.
 Inside rearview mirror
Adjust the rearview mirror so that the center view through the rear window is
seen. Make this adjustment before you start driving.
Do not place objects in the rear seat which would interfere with yo ...
 Instrument cluster
1. Tachometer
2. Speedometer
3. Engine coolant temperature gauge
4. Fuel gauge
5. Turn signal indicators
6.Warning and indicator lights
7. LCD display ...
See also:
Torque Converter Control Solenoid Valve (T/CON_VFS) Circuit Diagram
...
Winter driving
Severe weather conditions in the winter result in greater wear and other problems.
To minimize the problems of winter driving, you should follow these suggestions:
Snowy or Icy conditions
To dr ...
Inspection
[EVAP. Leakage Test]
1.
Select "Evap. Leakage Test".
2.
Proceed with the test according to the screen introductio ...
Categories
- Home
- Kia Forte BD 2019-2026 Owners Manual
- Kia Forte BD 2019-2026 Service Manual
- First Generation
- Second generation
- Kia Forte TD 2014-2018 Owners Manual
- Kia Forte TD 2014-2018 Service Manual
