 Kia Forte: Front Pillar Trim Replacement
| Х
|
Put on gloves to protect your hands.
|
|
| Х
|
When prying with a flat-tip screwdriver, wrap it with
protective tape, and apply protective tape around the related
parts, to prevent damage.
|
| Х
|
Use a plastic panel removal tool to remove interior trim
pieces to protect from marring the surface.
|
| Х
|
Take care not to bend or scratch the trim and panels.
|
|
|
1. |
Remove the front pillar trim.
|
(1) |
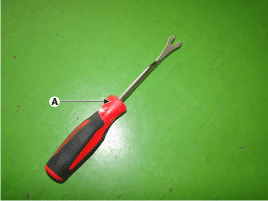
To remove the front pillar trim, the below tool (A) must
be used.

|
|
(2) |
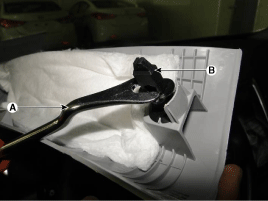
Slightly spread open the front pillar trim and then place
the tool (A) on the mounting clip (B) like the picture below.
After placing the tool (A) on the mounting clip (B) push
it to the front.
|
Х |
Once the front pillar trim has been removed,
replace the clips to new ones.
|
|

|
|
(3) |
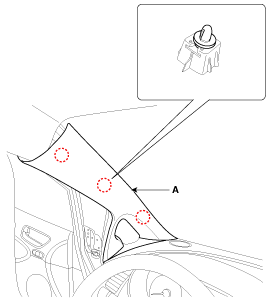
Remove the front pillar trim (A).

|
Х |
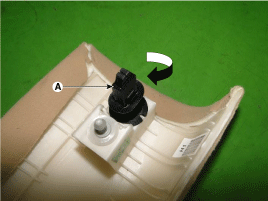
Remove the mounting clip (A) by turning
it clockwise.

|
|
|
|
|
2. |
Install in the reverse order of removal.
|
Х |
Replace any damaged clips.
|
|
|
(4Door, 5Door)
1. Center pillar lower trim
2. Center pillar upper trim
(2Door)
1. Rear inner outer trim
2. Center pillar upper ...
See also:
Components
1. Union bolt
2. Gasket
3. Tube joint
4. Clutch tube
5. Valve plate
6. Valve spring
7. Bleeder screw
8. Release cylinder
9. Return spring
10. Piston
11. Bo ...
Front Pillar Trim Component Location
1. Front pillar trim
...
Interior overview
1. Driver position memory system button
2. Inside door handle
3. Outside rearview mirror folding
4. Outside rearview mirror control
5. Central door lock switch
6. Power window lock switch
7. ...
 Kia Forte: Front Pillar Trim Replacement
 Front Pillar Trim Component Location
 Center Pillar Trim Component Location


