 Kia Forte: Front Seat Assembly Replacement
Second generation YD (2014-2018) / Kia Forte TD 2014-2018 Service Manual / Body (Interior and Exterior) / Front Seat / Front Seat Assembly Replacement
|

| 1. |
Remove the front seat track mounting cover.
|
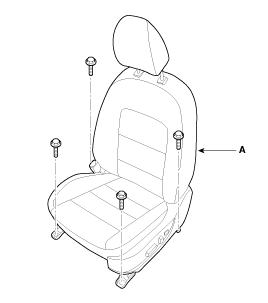
| 2. |
After loosening the mounting bolts, remove the front seat assembly
(A).
|
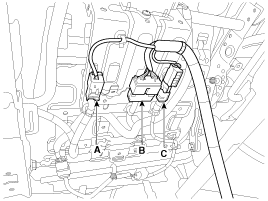
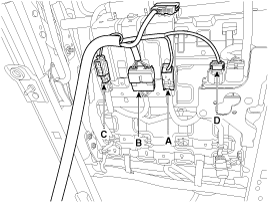
| 3. |
Disconnect the seat buckle connector (A), seat warmer & power
seat connector (B), SAB connector(C), PODS connector (D).
[Driver's]
[Passenger's]
|
| 4. |
Install in the reverse order of removal.
|
 Front Seat Assembly Component Location
1. Front seat assembly
...
 Front Seat Shield Outer Cover Component Location
1. Front seat shield outer cover
...
See also:
Oil Pump Unit (OPU) Inspection
OPU Problem Inspection Procedure
1.
TEST OPU GROUND CIRCUIT: Measure resistance between OPU and chassis
ground using the backside of OPU harness connector ...
Audio Remote Control Removal
1.
Disconnect the negative (-) battery terminal.
2.
Remove the driver airbag module.
(Refer to Restraint - "Driver Airbag (DAB) Mod ...
Smart key
With a smart key, you can lock or unlock a door and even start the engine without
inserting the key.
The functions of the buttons on a smart key are similar to the remote keyless
entry. (Refer ...
Categories
- Home
- Kia Forte BD 2019-2026 Owners Manual
- Kia Forte BD 2019-2026 Service Manual
- First Generation
- Second generation
- Kia Forte TD 2014-2018 Owners Manual
- Kia Forte TD 2014-2018 Service Manual

Copyright ® www.kifomanual.com 2014-2026