 Kia Forte: Rear Bumper Beam Assembly Replacement
| ŌĆó
|
Put on gloves to protect your hands.
|
|
| ŌĆó
|
When prying with a flat-tip screwdriver, wrap it with
protective tape, and apply protective tape around the related
parts, to prevent damage.
|
| ŌĆó
|
Use a plastic panel removal tool to remove interior trim
pieces to protect from marring the surface.
|
| ŌĆó
|
Take care not to bend or scratch the trim and panels.
|
|
|
1. |
Remove the rear bumper cover.
(Refer to Rear Bumper - "Rear Bumper Cover")
|
|
2. |
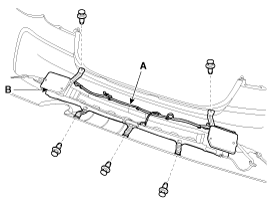
Disconnect the rear bumper beam mounting wiring harness (A).
|
|
3. |
After loosening the mounting clips, then remove the rear bumper
beam assembly (B).

|
|
4. |
Install in the reverse order of removal.
|
ŌĆó |
Make sure the connector is plugged in properly.
|
|
ŌĆó |
Replace any damaged clips.
|
|
|
(5Door)
| ŌĆó
|
Put on gloves to protect your hands.
|
|
| ŌĆó
|
When prying with a flat-tip screwdriver, wrap it with
protective tape, and apply protective tape around the related
parts, to prevent damage.
|
| ŌĆó
|
Use a plastic panel removal tool to remove interior trim
pieces to protect from marring the surface.
|
|
|
1. |
Remove the rear bumper cover.
(Refer to Rear Bumper - "Rear Bumper Cover")
|
|
2. |
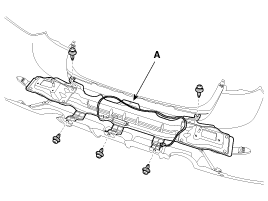
Remove the mounting clips, then remove the rear bumper beam assembly
(A).

|
|
3. |
Install in the reverse order of removal.
|
ŌĆó |
Replace any damaged clips.
|
|
|
(4Door, 2Door)
1. Rear bumper beam assembly
(5Door)
1. Rear bumper beam assembly
...
See also:
Seat Belt Pretensioner (BPT)
The Seat Belt Pretensioners (BPT) are installed inside Center Pillar (LH
& RH). When a vehicle crashes with a certain degree of frontal impact, the pretensioner
seat belt helps to reduce ...
Daytime running light
Daytime Running Lights (DRL) can make it easier for others to see the front of
your vehicle during the day.
DRL can be helpful in many different driving conditions, and it is especially
helpful aft ...
DC/DC Converter Circuit Diagram
In the ISG mode, if the power of an audio system turnsOFF by drawdown
while ŌĆ£Auto StartingŌĆØ or ŌĆ£Idle StartingŌ ...
 Kia Forte: Rear Bumper Beam Assembly Replacement
 Rear Bumper Beam Assembly Component Location
 Front Seat


