 Kia Forte: Steering Column Shroud Panel Replacement
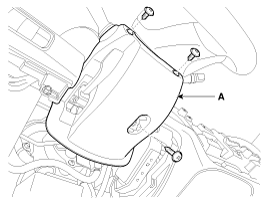
[Steering column shroud lower panel]
| Х
|
Put on gloves to protect your hands.
|
|
| Х
|
When prying with a flat-tip screwdriver, wrap it with
protective tape, and apply protective tape around the related
parts, to prevent damage.
|
| Х
|
Use a plastic panel removal tool to remove interior trim
pieces to protect from marring the surface.
|
| Х
|
Take care not to bend or scratch the trim and panels.
|
|
|
1. |
Remove the crash pad lower panel.
(Refer to Crash Pad - "Crash Pad Lower Panel")
|
|
2. |
After loosening the mounting screws, then remove the steering
column shroud lower panel (A).

|
|
3. |
Install in the reverse order of removal.
|
Х |
Replace any damaged clips.
|
|
|
[Steering column shroud upper panel]
| Х
|
Put on gloves to protect your hands.
|
|
| Х
|
When prying with a flat-tip screwdriver, wrap it with
protective tape, and apply protective tape around the related
parts, to prevent damage.
|
| Х
|
Use a plastic panel removal tool to remove interior trim
pieces to protect from marring the surface.
|
| Х
|
Take care not to bend or scratch the trim and panels.
|
|
|
1. |
Remove the cluster fascia panel.
(Refer to Crash Pad - "Cluster Fascia Panel")
|
|
2. |
Install in the reverse order of removal.
|
Х |
Replace any damaged clips.
|
|
|
1. Steering column shroud lower panel
2. Steering column shroud upper panel
...
[LH]
1. Crash pad side cover [LH]
[RH]
1. Crash pad side cover [RH]
...
See also:
Air Ventilation Seat Unit Description
The ventilated seat system uses a Push method to cool the seat. A blower
mounted in the seat generates the cool air, which then travels through ducts
to the seat back and cushion.
...
Certification label
The certification label is located on the driver's door sill at the center pillar.
This label shows the maximum allowable weight of the fully loaded vehicle. This
is called the GVWR (Gross V ...
Specifications
Item
Specifications
Working voltage
DC 12V
Operating force
9.8 ± 2.9N
(1.0 ± 0.3kg, 7.2 ± 0.7lb)
Working temperature
...
 Kia Forte: Steering Column Shroud Panel Replacement
 Steering Column Shroud Panel Component Location
 Crash Pad Side Cover Component Location


