 Kia Forte: Tail Gate Latch Replacement
Second generation YD (2014-2018) / Kia Forte TD 2014-2018 Service Manual / Body (Interior and Exterior) / Tail Gate / Tail Gate Latch Replacement
| (5Door) |
|

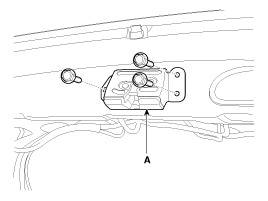
| 1. |
After loosening the mounting bolts, then remove the tail gate
latch assembly (A).
|
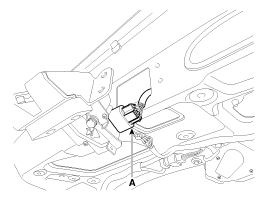
| 2. |
Disconnect the tail gate latch connector (A).
|
| 3. |
Install in the reverse order of removal.
|

 Tail Gate Latch Component Location
(5Door)
1. Tail gate latch assembly
...
 Tail Gate Lift Replacement
(5Door)
ŌĆó
Take care to not let the tailgate fall on you as the lifts
are ...
See also:
Transaxle Control Module (TCM) Installation
1.
Installation is reverse of removal.
ŌĆó
...
Blower Resistor Inspection
1.
Measure terminal-to-terminal resistance of the blower resistor.
2.
If the measured resistance is not within specification, the blower
re ...
Categories
- Home
- Kia Forte BD 2019-2026 Owners Manual
- Kia Forte BD 2019-2026 Service Manual
- First Generation
- Second generation
- Kia Forte TD 2014-2018 Owners Manual
- Kia Forte TD 2014-2018 Service Manual

Copyright ® www.kifomanual.com 2014-2026