Kia Forte: Timing Chain Cover Installation - Timing System - Engine Mechanical System - Kia Forte TD 2014-2018 Service ManualKia Forte: Timing Chain Cover Installation

Second generation YD (2014-2018) / Kia Forte TD 2014-2018 Service Manual / Engine Mechanical System / Timing System / Timing Chain Cover Installation

1.
Install the timing chain cover.
(1)
Using a gasket scraper, remove all the old packing material from the gasket surfaces.
(2)
The sealant locations on the chain cover and the counter parts (cam carrier, cylinder head, cylinder block, and lower crankcase) must be free of harmful foreign materials, oil, dust and moisture. Spraying cleaner on the surface and wiping with a clean duster.
(3)
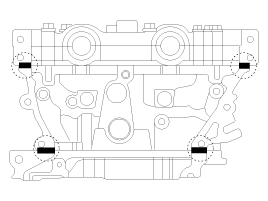
Before assembling the timing chain cover, liquid sealant should be applied on the gap between cam carrier, cylinder head and cylinder block.

Bead width: 3.0 ~ 5.0 mm (0.11 ~ 0.20 in.)
Sealant: Threebond 1217H or equivalent

(4)
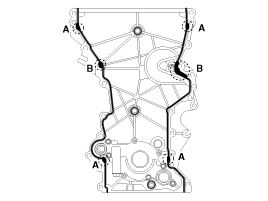
After applying liquid sealant on the timing chain cover, assemble the cover within 5 minutes after sealant was applied. Continuous bead of sealant should be applied to prevent any path from oil leakage.

Bead width
Whole section: 2.5 ~ 3.5 mm (0.10 ~ 0.14 in.)
Section A: 4.5 ~ 5.5 mm (0.18 ~ 0.22 in.)
Section B: 8.0 ~ 9.0 mm (0.32 ~ 0.35 in.)
Sealant: Threebond 1217H or equivalent

(5)
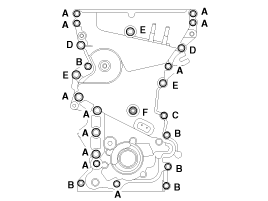
Install the timing chain cover. The dowel pins on the cylinder block and holes on the timing chain cover should be used as a reference in order to assemble the timing chain cover in exact position.

Tightening torque
Bolts (A, B):
18.6 ~ 23.5 N.m (1.9 ~ 2.4 kgf.m, 13.7 ~ 17.4 lb-ft)
Bolt (C):
19.6 ~ 23.5 N.m (2.0 ~ 2.4 kgf.m, 14.5 ~ 17.4 lb-ft)
Bolts (D,E):
39.2 ~ 49.0 N.m (4.0 ~ 5.0 kgf.m, 28.9 ~ 36.2 lb-ft)
Bolt (F):
9.8 ~ 11.8 N.m (1.0 ~ 1.2 kgf.m, 7.2 ~ 8.7 lb-ft)

  
Do not reuse the seal bolts (C,F).
  
The engine running or pressure test should not be performed within 30 minutes after the timing chain cover was assembled.
2.
Replace the front oil seal if necessary.
(Refer to Timing System - “Front Oil Seal”)
3.
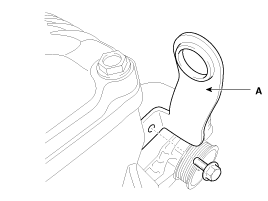
Install the front engine hanger (A).

Tightening torque :
34.3 ~ 39.2 N.m (3.5 ~ 4.0 kgf.m, 25.3 ~ 28.9 lb-ft)

4.
Install the other parts reverse order of removal.
5.
Add all the necessary fluids and check for leaks. Connect GDS. Check for codes, note, and clear. Recheck.
  
Refill engine with engine oil.
Clean battery posts and cable terminals and assemble.
Inspect for fuel leakage.
-
After assembling the fuel line, turn on the ignition switch (do not operate the starter) so that the fuel pump runs for approximately two seconds and fuel line pressurizes.
-
Repeat this operation two or three times, then check for fuel leakage at any point in the fuel line.
Timing Chain Cover Removal
Engine removal is not required for this procedure.    • Use fender covers to avoid damaging pa ...

Timing Chain Components
1. Intake camshaft 2. Exhaust camshaft 3. Intake CVVT assembly 4. Exhaust CVVT assembly 5. Timing chain 6. Timing chain tensioner arm 7. Timing chain tensioner 8. T ...

See also:

Starter Relay Inspection
1. Disconnect the battery negative terminal. 2. Remove the fuse box cover. 3. Remove the starter relay (A). ...

Tail Gate Lift Replacement
(5Door)    • Take care to not let the tailgate fall on you as the lifts are re ...

Shift Lever Removal
1. Remove the floor Interior console assembly. (Refer to Body - " Floor Console") 2. Remove the cover (A). ...

Copyright © www.kifomanual.com 2014-2024