 Kia Forte: Front Driveshaft Replacement
Second generation YD (2014-2018) / Kia Forte TD 2014-2018 Service Manual / Driveshaft and axle / Driveshaft Assembly / Front Driveshaft Replacement
| 1. |
Loosen the wheel nuts slightly.
Raise the vehicle, and make sure it is securely supported.
|
| 2. |
Remove the front wheel and tire (A) from front hub .
|


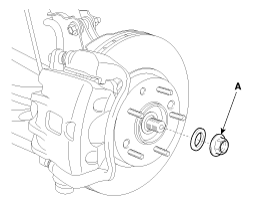
| 3. |
Remove the driveshaft coking nut (A).
|

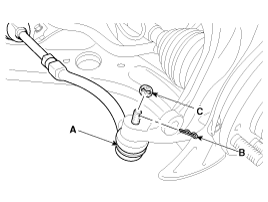
| 4. |
Remove the tie rod end ball joint (A) from the knuckle.
|

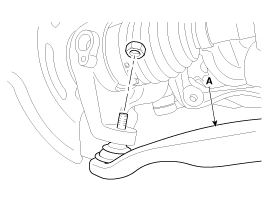
| 5. |
Remove the lower arm (A) from the knuckle.
|
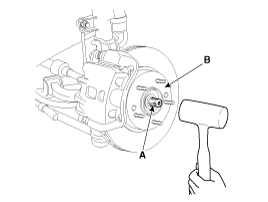
| 6. |
Using a plastic hammer, disconnect driveshaft (A) from the axle
hub (B).
|
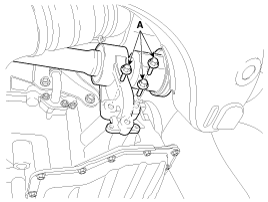
| 7. |
Loosen the inner shaft mounting bolt (A). (T-GDI Engine only)
|
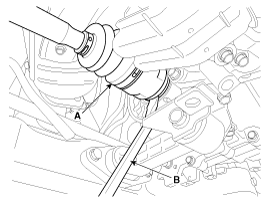
| 8. |
Insert a pry bar (A) between the transaxle case and joint case,
and separate the drive shaft (B) from the transaxle case.
|
| 9. |
Install in the reverse order of removal.
|
| 10. |
Check the front alignment.
(Refer to Suspension System - "Front Alignment")
|
 Front Driveshaft Component
1. Driveshaft (LH)
2. Circlip
3. Driveshaft (RH)
...
 TJ Joint Components
[LH]
1. BJ assembly
2. BJ circlip
3. BJ boot band
4. BJ boot
5. Shaft
6. TJ boot band
7. TJ boot
8. Spider assembly
9. Snap ring
10. TJ c ...
See also:
Tail Gate Trim Replacement
(5Door)
[Tail gate upper trim]
•
When prying with a flat-tip screwdri ...
Oil Cooler Removal and Installation
1.
Remove the cooling fan.
(Refer to Cooling System - "Cooling Fan")
2.
Remove the radiator upper hose (A).
...
Alternator Components
1. OAD (Overrunning Alternator Decoupler) pulley
2. Front housing
3. Front bearing
4. Stator
5. Rotor
6. Rear bearing
7. Rear housing
8. Rectifier assembly
9. Re ...
Copyright © www.kifomanual.com 2014-2024