 Kia Forte: Inhibitor Switch Installation
Second generation YD (2014-2018) / Kia Forte TD 2014-2018 Service Manual / Automatic Transaxle System / Automatic Transaxle Control System / Inhibitor Switch Installation
| 1. |
Check that the shift lever is placed in the "N" position
|
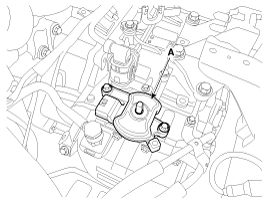
| 2. |
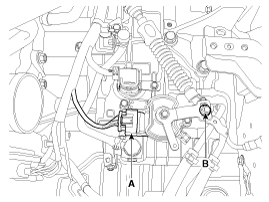
Install the inhibitor switch (A).
|
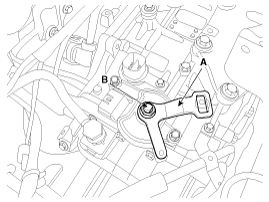
| 3. |
Install the manual control lever (A).
|
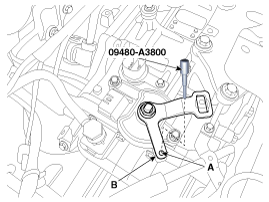
| 4. |
Align the hole (A) in the manual control lever with the "N" position
hole (B) of the inhibitor switch and then insert the SST inhibitor switch
guide pin (09480-A3800).
|
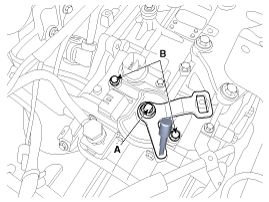
| 5. |
Tighten the nut (A) and bolts (B) with the specified torque.
|
| 6. |
Remove the SST (09480-A3800) from the hole.
|
| 7. |
Connect the inhibitor switch connector (A).
|
| 8. |
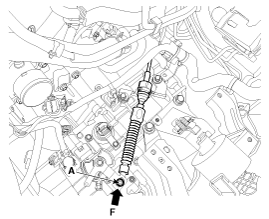
Install the shift cable by tightening nut (B).
|
| 9. |
Push the shift cable to the arrow "F" to eliminate free play and
then tighten the nut (A) with the specified torque.
|
| 10. |
Install the battery and battery tray.
(Refer to Engine Electrical System - "Battery")
|
| 11. |
Install the air cleaner assembly.
(Refer to Engine Mechanical System - "Air cleaner")
|
 Inhibitor Switch Removal
1.
Place the shift lever into the "N" position.
2.
Remove the air cleaner.
(Refer to Engine Mechanical System - "Air clea ...
 Shift Lever Components
1. Shift lever knob
2. Shift lever assembly
3. Shift cable assembly
4. Shift lever knob & boots assembly
5. Manual control lever
6. Retainer
...
See also:
Driving your vehicle
Be sure the exhaust system does not leak.
The exhaust system should be checked whenever the vehicle is raised to change
the oil or for any other purpose. If you hear a change in the sound of the exh ...
Special Service Tools
Tool (Number and name)
Illustration
Use
Crankshaft front oil seal installer
09231-2E000
Installation of the front oil seal
Valv ...
Alternator Description
The charging system included a battery, an alternator with a built-in
regulator, and the charging indicator light and wire.
The Alternator has eight built-in diodes, each rectifying AC curre ...
Copyright © www.kifomanual.com 2014-2024


