 Kia Forte: Tail Gate Trim Replacement
| •
|
When prying with a flat-tip screwdriver, wrap it with
protective tape, and apply protective tape around the related
parts, to prevent damage.
|
| •
|
Put on gloves to protect your hands.
|
|
|
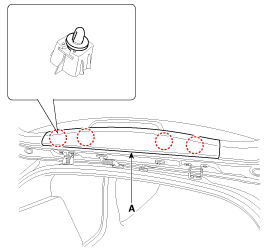
1. |
Using a screwdriver or remover, remove the tail gate upper trim
(A).
|
|
2. |
Install in the reverse order of removal.
|
• |
Replace any damaged clips.
|
|
|
[Tail gate trim]
| •
|
When prying with a flat-tip screwdriver, wrap it with
protective tape, and apply protective tape around the related
parts, to prevent damage.
|
| •
|
Put on gloves to protect your hands.
|
|
|
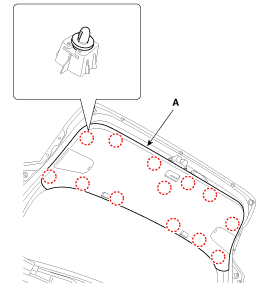
1. |
Using a screwdriver or remover, remove the tail gate trim (A).
|
|
2. |
Install in the reverse order of removal.
|
• |
Replace any damaged clips.
|
|
|
[Tail gate side trim]
| •
|
When prying with a flat-tip screwdriver, wrap it with
protective tape, and apply protective tape around the related
parts, to prevent damage.
|
| •
|
Put on gloves to protect your hands.
|
|
|
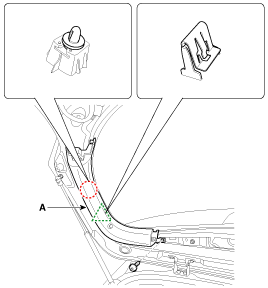
1. |
Remove the tail gate upper trim.
|
|
2. |
Remove the tail gate trim.
|
|
3. |
After loosening the mounting screw, then remove the tail gate
side trim (A).
|
|
4. |
Install in the reverse order of removal.
|
• |
Replace any damaged clips.
|
|
|
(5Door)
1. Tail gate trim
...
(5Door)
1. Tail gate latch assembly
...
See also:
IMS Control Switch Inspection
1.
With the power seat switch in each position, make sure that continuity
exists between the terminals below. If continuity is not as specified,
replace the power seat ...
Description
The SMART KEY system is a system that allows the user to access and operate
a vehicle in a very convenient way. To access the vehicle, no traditional key
or remote control unit is needed.
...
Room Lamp Removal
Room Lamp
1.
Disconnect the negative(-) battery terminal.
2.
Carefully remove the lamp lens (A) from the room lamp with a flat-tip
scre ...


 Tail Gate Trim Component Location
 Tail Gate Latch Component Location