 Kia Forte: Back up lamp, Rear fog lamp
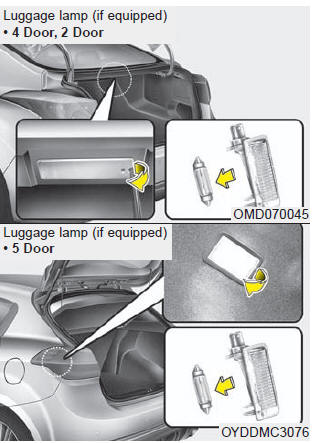
1. Take the lamp assembly out.
2. Remove the socket from the assembly by turning the socket counterclockwise until the tabs on the socket align with the slots on the assembly.
3. Remove the bulb by pulling it out.
4. Insert a new bulb by inserting it into the socket.
5. Install the light assembly to the trunk.
6. Reinstall the nuts and connector and then the trunk lid cover by pushing in the screw.
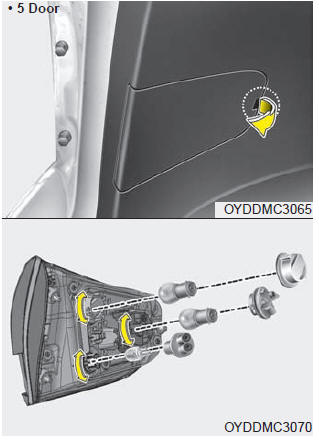
5 Door
1. Turn off the engine.
2. Open the tailgate.
3. Remove the service cover.
4. Remove the socket from the assembly by turning the socket counterclockwise until the tabs on the socket align with the slots on the assembly.
5. Remove the bulb from the socket by pressing it in and rotating it counterclockwise until the tabs on the bulb align with the slots in the socket. Pull the bulb out of the socket.
6. Insert a new bulb by inserting it into the socket and rotating it until it locks into place.
7. Install the socket in the assembly by aligning the tabs on the socket with the slots in the assembly.
Push the socket into the assembly and turn the socket clockwise.
8. Install the service cover by putting it into the service hole.
Stop/tail light (LED type)
If the light does not operate, we recommend that the system be checked by an authorized Kia dealer.
High mounted stop lamp replacement (if equipped)
High mounted stop lamp replacement (if equipped)
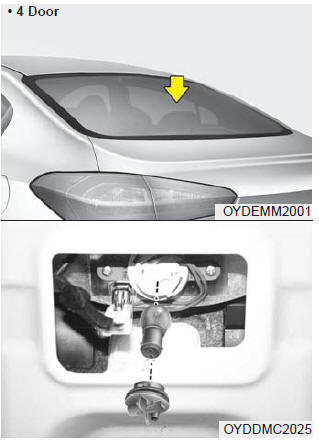
4 Door
1. Open the trunk.
2. Remove the socket by turning it counterclockwise until the tabs on the socket align with the slots.
3. Remove the bulb from the socket by pressing it in and rotating it counterclockwise until the tabs on the bulb align with the slots in the socket. Pull the bulb out of the socket.
4. Insert a new bulb by inserting it into the socket and rotating it until it locks into place.
5. Install the socket in the assembly by aligning the tabs on the socket with the slots in the assembly.
Push the socket into the assembly and turn the socket clockwise.
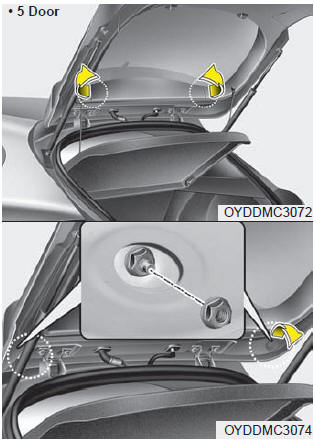
5 Door
1. Open the tailgate.
2. Gently remove the center cover of the rear tailgate trim.
3. Disconnect the electrical connector.
4. Loosen the retaining nuts and remove the spoiler.
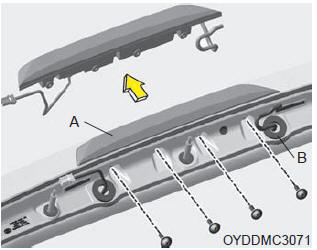
5. Remove the high mounted stop lamp assembly (A) after loosening the nuts and washer nozzle (B).
6. Reinstall a new lamp assembly in the reverse order of removal.
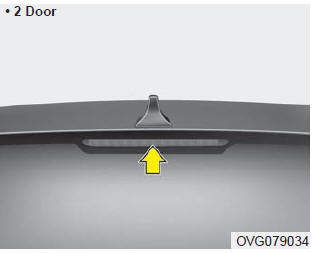
2 Door
If the light bulb does not operate, we recommend the vehicle be checked by an authorized Kia dealer. A skilled technician should check or repair the high mounted stop light, for it may affect the performance of the curtain airbags or damage related interior parts of the vehicle.
License plate lamp bulb replacement
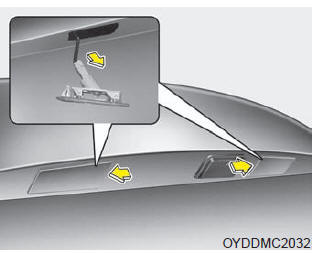
1. Remove the cover by pressing it as direction of the arrows.
2. Remove the socket by turning it counterclockwise.
3. Remove the bulb by pulling it straight out.
4. Install a new bulb.
5. Reinstall the bulb assembly securely with the retaining screws.

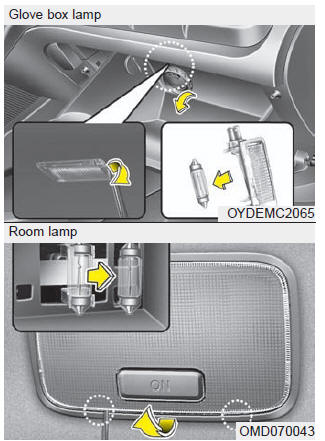
Interior lamp bulb replacement
1. Using a flat-blade screwdriver, gently pry the lens from the interior light housing.
2. Remove the bulb by pulling it straight out.
3. Install a new bulb in the socket.
WARNING
Prior to working on the Interior Lamps, ensure that the ŌĆ£OFFŌĆØ button is depressed to avoid burning your fingers or receiving an electric shock.
4. Align the lens tabs with the interior lamp housing notches and snap the lens into place.
CAUTION
Use care not to dirty or damage lens, lens tab, and plastic housings.
 Outside lamp
4 Door, 2Door
1. Open the trunk lid.
2. Remove the service cover by pulling out the service cover.
5 Door
1. Turn off the engine.
2. Open the tailgate.
3. Loosen the light assembly retai ...
 Appearance care
...
See also:
SS-A Solenoid Valve(ON/OFF) Description
Shift Solenoid(SS) Valve-A is attached to the valve body and is an on/off
solenoid valve that is used to change gears. Shift Solenoid(SS) Valve-A is installed
at valve body.
...
Installation
1.
Install in the reverse order of removal.
2.
After be equipped, perform bleeding air procedure in clutch release
cylinder after pouring t ...
SS-B Solenoid Valve(ON/OFF) Description
Shift Solenoid(SS) Valve-B is attached to the valve body and is an on/off
solenoid valve that is used to change gears. Shift Solenoid(SS) Valve-B is installed
at valve body.
...
Categories
- Home
- Kia Forte BD 2019-2026 Owners Manual
- Kia Forte BD 2019-2026 Service Manual
- First Generation
- Second generation
- Kia Forte TD 2014-2018 Owners Manual
- Kia Forte TD 2014-2018 Service Manual
