
 Kia Forte: Troubleshooting
Second generation YD (2014-2018) / Kia Forte TD 2014-2018 Service Manual / Body Electrical System / Lighting System / Troubleshooting
| 1. |
The lamp switch inputs can be checked using the GDS.
|
| 2. |
To check the input value of lamp switch, select option "Body Control
Module".
|
| 3. |
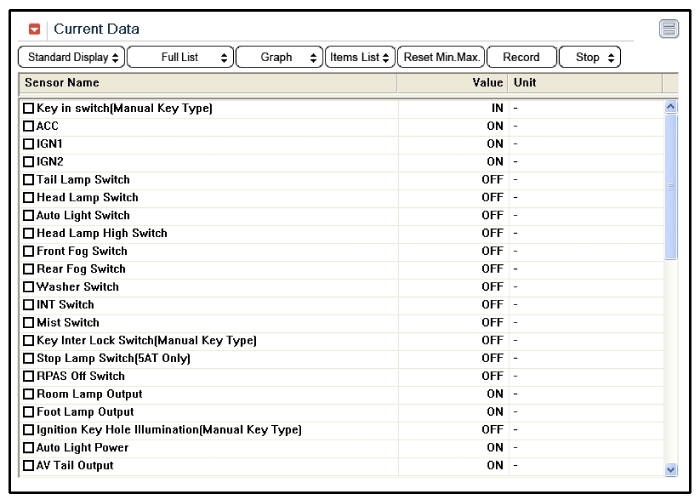
To consult the present input/output value of BCM, "Current DATA".
It provides information of BCM input/output conditions of power supply,
turn signal/brake lamp, headlamp, door, locks, outside mirror, wiper,
auto-light and transmitters etc.
|
| 4. |
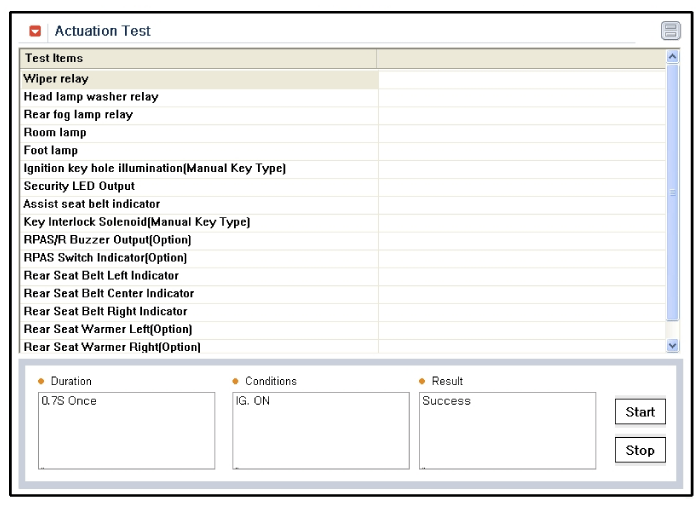
To check the input value of lamp switch in force mode, select
option "Actuation Test".
|
| Symptom |
Possible cause |
Remedy |
| One lamp does not light (all exterior) |
Bulb burned out |
Replace bulb |
| Socket, wiring or ground faulty |
Repair if necessary |
|
| Head lamps do not light |
Bulb burned out |
Replace bulb |
| Ignition fuse (LOW:10A, HIGH:20A) blown |
Check for short and replace fuse |
|
| Head lamp fuse (15A) blown |
Check for short and replace fuse |
|
| Head lamp relay faulty |
Check relay |
|
| Lighting switch faulty |
Check switch |
|
| Wiring or ground faulty |
Repair if necessary |
|
| Tail lamps and license plate lamps do not light |
Bulb burned out |
Replace bulb |
| Tail lamp fuse (10A) blown |
Check for short and replace fuse |
|
| Tail lamp relay faulty |
Check relay |
|
| Lighting switch faulty |
Check switch |
|
| Wiring or ground faulty |
Repair if necessary |
|
| Stop lamps do not light |
Bulb burned out |
Replace bulb |
| Stop lamp fuse (15A) blown |
Check for short and replace fuse |
|
| Stop lamp switch faulty |
Adjust or replace switch |
|
| Wiring or ground faulty |
Repair if necessary |
|
| Stop lamps do not turn off |
Stop lamp switch faulty |
Repair or replace switch |
| Instrument lamps do not light (Tail lamps light) |
Rheostat faulty |
Check rheostat |
| Wiring or ground faulty |
Repair if necessary |
|
| Turn signal lamp does not flash on one side |
Bulb burned out |
Replace bulb |
| Turn signal switch faulty |
Check switch |
|
| Wiring or ground faulty |
Repair if necessary |
|
| Turn signal lamps do not light |
Bulb burned out |
Replace bulb |
| Turn signal lamp fuse (10A) blown |
Check for short and replace fuse |
|
| Flasher unit faulty |
Check flasher unit |
|
| Turn signal switch faulty |
Check switch |
|
| Wiring or ground faulty |
Repair if necessary |
|
| Hazard warning lamps do not light |
Bulb burned out |
Replace bulb |
| Hazard warning lamp fuse (15A) blown |
Check for short and replace fuse |
|
| Flasher unit faulty |
Check flasher unit |
|
| Hazard switch faulty |
Check switch |
|
| Wiring or ground faulty |
Repair if necessary |
|
| Flasher rate too slow or too fast |
Lamps' wattages are smaller or larger than specified |
Replace lamps |
| Flasher unit faulty |
Check flasher unit |
|
| Back up lamps do not light |
Bulb burned out |
Replace bulb |
| Back up lamp fuse (10A) blown |
Check for short and replace fuse |
|
| Back up lamp switch (M/T) faulty |
Check switch |
|
| Transaxle range switch (A/T) faulty |
Check switch |
|
| Wiring or ground faulty |
Repair if necessary |
|
| Room lamp does not light |
Bulb burned out |
Replace bulb |
| Room lamp fuse (10A) blown |
Check for short and replace fuse |
|
| Room lamp switch faulty |
Check switch |
|
| Wiring or ground faulty |
Repair if necessary |
|
| Front fog lamps do not light |
Bulb burned out |
Replace bulb |
| Front fog lamp fuse (15A) blown |
Check for short and replace fuse |
|
| Front fog lamp relay faulty |
Check relay |
|
| Front fog lamp switch faulty |
Check switch |
|
| Wiring or ground faulty |
Repair if necessary |
|
| Rear fog lamps do not light |
Rear fog lamp fuse (15A) blown |
Check for short and replace fuse |
| Rear fog lamp fuse (15A) blown |
Check for short and replace fuse |
|
| Rear fog lamp switch faulty |
Check switch |
|
| Rear fog lamp relay faulty |
Check relay |
|
| Wiring or ground faulty |
Repair if necessary |
|
| Map lamp does not light |
Bulb burned out |
Replace bulb |
| Room lamp fuse (10A) blown |
Check for short and replace fuse |
|
| Map lamp switch faulty |
Check switch |
|
| Wiring or ground faulty |
Repair if necessary |
|
| Trunk room lamp does not light |
Bulb burned out |
Replace bulb |
| Room lamp fuse (10A) blown |
Check for short and replace fuse |
|
| Trunk room lamp switch faulty |
Check switch |
|
| Wiring or ground faulty |
Repair if necessary |
 Turn Signal Lamp
Removal
1.
Remove the outside rear view mirror.
(Refer to Body - "Outside Rear View Mirror")
Installation
1.
Install the out ...
 maincat
...
See also:
Using the iPod® device
Some iPod® models may not support communication protocol and files may
not properly play. Supported iPod® models: iPhone® 3GS/4 iPod® touch 1st~4th
generation iPod® nano 1st~6th generation ...
Inspection
1.
Inspect diaphragm spring wear which is in contact with a clutch
release bearing.
2.
Check the clutch cover and disc surface for wear or ...
Adjustment
1.
After loosening the hinge (A) mounting bolt, adjust the hood (B)
by moving it up or down, or right or left.
2.
Adjust the hood height by ...
Categories
- Home
- Kia Forte BD 2019-2026 Owners Manual
- Kia Forte BD 2019-2026 Service Manual
- First Generation
- Second generation
- Kia Forte TD 2014-2018 Owners Manual
- Kia Forte TD 2014-2018 Service Manual

Copyright � www.kifomanual.com 2014-2026