 Kia Forte: Fuses
A vehicle's electrical system is protected from electrical overload damage by fuses.
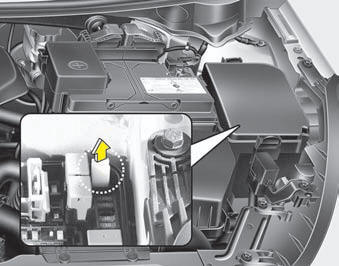
This vehicle has 2 fuse panels, one located in the driver's side panel bolster, others in the engine compartment near the battery.
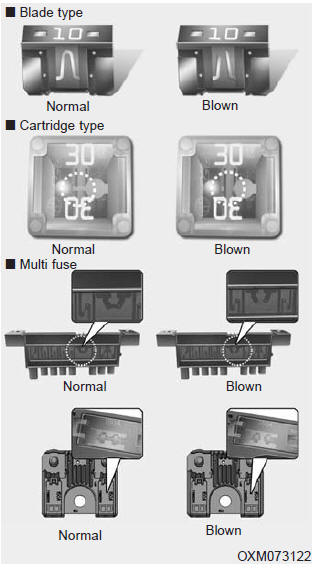
If any of your vehicle's lights, accessories, or controls do not work, check the appropriate circuit fuse. If a fuse has blown, the element inside the fuse will be melted.
If the electrical system does not work, first check the driver's side fuse panel. Always replace a blown fuse with one of the same rating.
Before replacing a blown fuse, move to safe place, turn off the engine and all electric devices, and disconnect the negative battery cable.
If the replacement fuse blows, this indicates an electrical problem. Avoid using the system involved and we recommend that you consult an authorized Kia dealer.
Four kinds of fuses are used: blade type for lower amperage rating, cartridge type, battery fuse terminal and multi fuse type for higher amperage ratings.
WARNING - Fuse replacement
- Never replace a fuse with anything but another fuse of the same rating.
- A higher capacity fuse could cause damage and possibly a fire.
- Never install a wire or aluminum foil instead of the proper fuse - even as a temporary repair. It may cause extensive wiring damage and a possible fire.
CAUTION
Do not use a screwdriver or any other metal object to remove fuses because it may cause a short circuit and damage the system.
CAUTION
- When replacing a blown fuse or relay with a new one, make sure the new fuse or relay fits tightly into the clips The incomplete fastening fuse or relay may cause the vehicle wiring and electric systems damage and a possible fire.
- Do not input any other objects except fuses or relays into fuse/relay terminals such as a driver or wiring. It may cause contact failure and system malfunction.
✽ NOTICE
The actual fuse/relay panel label may differ from equipped items.
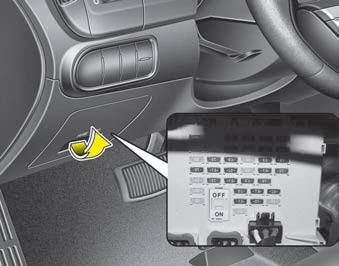
Instrument panel fuse replacement
1. Turn the ignition switch and all other switches off.
2. Open the fuse panel cover.
3. Pull the suspected fuse straight out. Use the removal tool provided in the engine compartment fuse panel.
4. Check the removed fuse; replace it if it is blown.
5. Push in a new fuse of the same rating, and make sure it fits tightly in the clips.
If it fits loosely, consult an authorized Kia dealer.
If you do not have a spare, use a fuse of the same rating from a circuit you may not need for operating the vehicle, such as the cigarette lighter fuse.
If the headlights or other electrical

components do not work and the fuses are OK, check the fuse panel in the engine compartment. If a fuse is blown, it must be replaced.
Fuse switch
Your vehicle is equipped with a fuse switch to prevent battery discharge if your vehicle is parked without being operated for prolonged periods.
Use the following procedures before parking the vehicle for prolonged periods.
1. Turn off the engine.
2. Turn off the headlights and tail lights.
3. Open the driverŌĆÖs side panel cover and move the fuse switch up to the OFF position.
✽ NOTICE
- If the fuse switch is in the OFF
position, the warning chime, audio, clock and interior lamps, etc., will not operate. Some items must be reset after replacement. Refer to ŌĆ£BatteryŌĆØ in this chapter.
- Even when the fuse switch is in the OFF position, the battery can still be discharged by operation of the headlights or other electrical devices.
CAUTION
After checking the fuse panel in the engine compartment, securely install the fuse panel cover. If not, electrical failures may occur from water contact.
Engine compartment fuse replacement
1. Turn the ignition switch and all other switches off.
2. Remove the fuse panel cover by pressing the tab and pulling the cover up.
3. Check the removed fuse; replace it if it is blown. To remove or insert the fuse, use the fuse puller in the engine compartment fuse panel.
4. Push in a new fuse of the same rating, and make sure it fits tightly in the clips. If it fits loosely, consult an authorized Kia dealer.
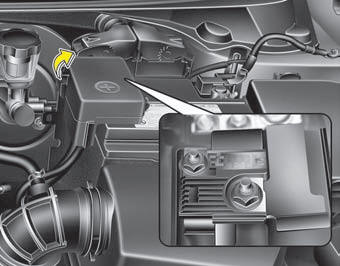
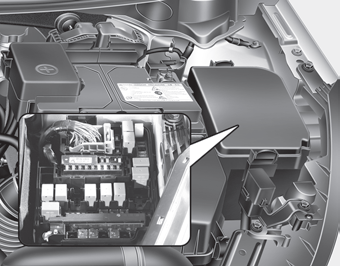
Main fuse
If the main fuse is blown, it must be removed as follows:
1. Turn off the engine.
2. Disconnect the negative battery cable.
3. Remove the nuts shown in the picture above.
4. Replace the fuse with a new one of the same rating.
5. Reinstall in the reverse order of removal.
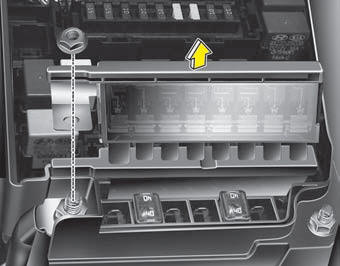
Multi fuse
If the multi fuse is blown, it must be removed as follows:
1. Remove the fuse panel in the engine compartment.
2. Remove the nuts shown in the picture above.
3. Replace the fuse with a new one of the same rating.
4. Reinstall in the reverse order of removal.
 Tire replacement
If the tire is worn evenly, a tread wear indicator will appear as a solid band
across the tread. This shows there is less than 1/16 inch (1.6 mm) of tread left
on the tire. Replace the tire when ...
 Fuse/relay panel description
Inside the fuse/relay panel covers, you can find the fuse/relay label describing
fuse/relay name and capacity.
✽ NOTICE
Not all fuse panel descriptions in this manual may be applicable t ...
See also:
Components
(4Door, 5Door)
1. Rear door inside handle cap
2. Rear door pull handle cap
3. Rear door trim
4. Rear door rear seal
5. Rear door panel
6. Rear door module
7. ...
Alternator Removal
1.
Disconnect the battery negative (-) cable.
2.
Remove the drive belt.
(Refer to Engine Mechanical System - "Timing Chain")
...
2. TCM Terminal Function
Connector [A]
Pin
Description
Pin
Description
1
-
54
-
2
Line pressure control solenoid valve (LINE_VFS)
55 ...
Categories
- Home
- Kia Forte BD 2019-2026 Owners Manual
- Kia Forte BD 2019-2026 Service Manual
- First Generation
- Second generation
- Kia Forte TD 2014-2018 Owners Manual
- Kia Forte TD 2014-2018 Service Manual
