 Kia Forte: Front Door Trim Replacement
| ŌĆó
|
Put on gloves to protect your hands.
|
|
| ŌĆó
|
When prying with a flat-tip screwdriver, wrap it with
protective tape, and apply protective tape around the related
parts, to prevent damage.
|
| ŌĆó
|
Be careful not to scratch the door trim and other parts.
|
|
|
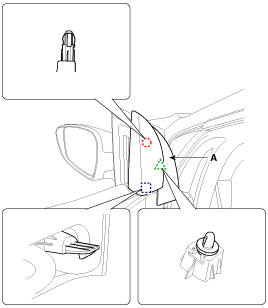
1. |
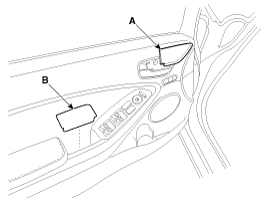
Using a screwdriver or remover, remove the front door inside handle
cap (A).
|
|
2. |
Remove the front door pull handle cap (B).
|
|
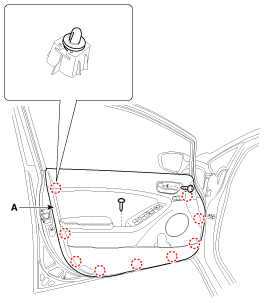
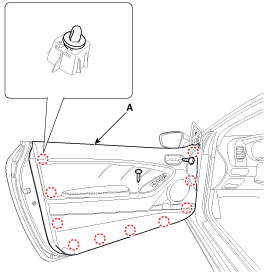
3. |
After loosening the mounting screws, then remove the front door
trim (A).
|
|
4. |
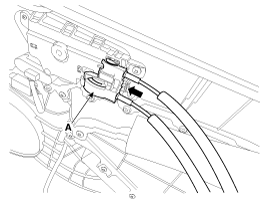
Remove the front door inside handle cage (A).
|
|
5. |
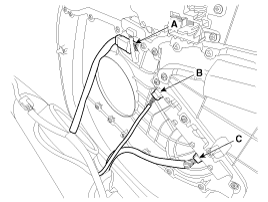
Disconnect the seat memory switch connecter (A), outside rear
view mirror switch connector (B), power window switch connector (C).
|
|
6. |
Install in the reverse order of removal.
|
ŌĆó |
Make sure the connector is connected properly.
|
|
ŌĆó |
Make sure the door locks/unlocks and opens/closes
properly.
|
|
ŌĆó |
Replace any damaged clips.
|
|
|
(2Door)
| ŌĆó
|
Put on gloves to protect your hands.
|
|
| ŌĆó
|
When prying with a flat-tip screwdriver, wrap it with
protective tape, and apply protective tape around the related
parts, to prevent damage.
|
| ŌĆó
|
Be careful not to scratch the door trim and other parts.
|
|
|
1. |
Using a screwdriver or remover, remove the front door quadrant
inner cover (A).
|
|
2. |
Using a screwdriver or remover, remove the front door inside handle
cap (A).
|
|
3. |
Remove the front door pull handle cap (B).
|
|
4. |
After loosening the mounting screws, then remove the front door
trim (A).
|
|
5. |
Remove the front door inside handle cage (A).
|
|
6. |
Disconnect the seat memory switch connecter (A), outside rear
view mirror switch connector (B), power window switch connector (C).
|
|
7. |
Install in the reverse order of removal.
|
ŌĆó |
Make sure the connector is connected properly.
|
|
ŌĆó |
Make sure the door locks/unlocks and opens/closes
properly.
|
|
ŌĆó |
Replace any damaged clips.
|
|
|
(4Door, 5Door)
1. Front door trim
(2Door)
1. Front door trim
...
(4Door, 5Door, 2Door)
1.
Remove the front door trim.
(Refer to Front Door - "Front Door Trim")
2.
After loosenin ...
See also:
Instrument Cluster Removal
1.
Disconnect the negative (-) battery terminal.
2.
Remove the cluster fascia panel.
(Refer to Body - "Cluster Fascia Panel") ...
Power Door Lock Switch Inspection
Driver Door Lock Switch
1.
Disconnect the negative (-) battery terminal.
2.
Remove the front door trim.
(Refer to Body - "Front ...
Components
Components (1)
(4Door, 2Door)
1. Rear bumper cover
2. Rear bumper beam assembly
3. Rear bumper lower side bracket
4. Rear bumper side bracket [RH]
5. Rear bump ...


 Front Door Trim Component Location
 Front Door Inside Handle Replacement