 Kia Forte: Input Speed Sensor Removal
Second generation YD (2014-2018) / Kia Forte TD 2014-2018 Service Manual / Automatic Transaxle System / Automatic Transaxle Control System / Input Speed Sensor Removal
| 1. |
Disconnect the negative (-) battery cable.
|
| 2. |
Remove the air cleaner assembly and air duct.
(Refer to Engine Mechanical System - "Air cleaner")
|
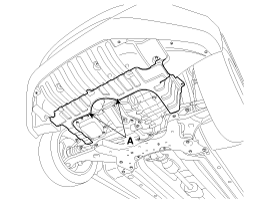
| 3. |
Remove the under cover (A).
|
| 4. |
Replace new gasket and the plug after draining the automatic transaxle
fluid by removing the drain plug.
(Refer to Hydraulic System - "Fluid")
|
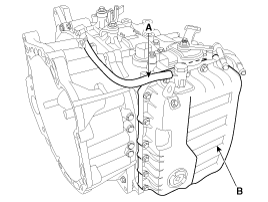
| 5. |
Remove the air breather hose (A).
|
| 6. |
Remove the valve body cover (B).
|

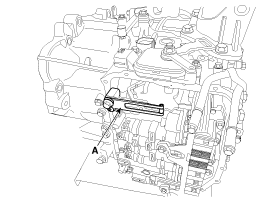
| 7. |
Remove the plate and the detent spring (A) after removing the
bolt.
|
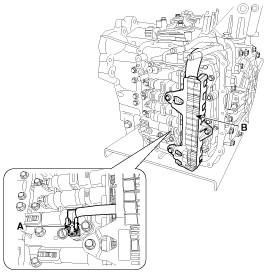
| 8. |
Remove the bolt (3ea) after disconnecting the solenoid valve connector
(B) and the oil temperature sensor connector (A).
|

| 9. |
Remove the valve body assembly (A).
|

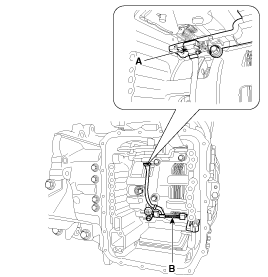
| 10. |
Disconnect the input & output speed sensor connector(A).
|
| 11. |
Remove the input & output speed sensor (B) after removing the
bolts(2ea).
|
 Input Speed Sensor Inspection
1.
Check signal waveform of Input & output speed sensor using the
GDS.
Specification:
Refer to "Signal Wave Form" section.
...
 Input Speed Sensor Installation
1.
Installation is the reverse of removal.
After replacement or reinstallation procedure of ...
See also:
Troubleshooting
Symptom
Suspect area
Engine will not start or hard to start
Vapor hose damaged or disconnected
Engine hard to start
Malfunction of the Purge C ...
DC/DC Converter Installation
1.
Install in the reverse order of removal.
If the battery negative (-) c ...
Record your key number
The key code number is stamped on the key code tag attached to the key set. Should
you lose your keys, this number will enable an authorized Kia dealer to duplicate
the keys easily. Remove the k ...
Categories
- Home
- Kia Forte BD 2019-2026 Owners Manual
- Kia Forte BD 2019-2026 Service Manual
- First Generation
- Second generation
- Kia Forte TD 2014-2018 Owners Manual
- Kia Forte TD 2014-2018 Service Manual

Copyright ® www.kifomanual.com 2014-2026