 Kia Forte: Tail Gate Trim Replacement
| ŌĆó
|
When prying with a flat-tip screwdriver, wrap it with
protective tape, and apply protective tape around the related
parts, to prevent damage.
|
| ŌĆó
|
Put on gloves to protect your hands.
|
|
|
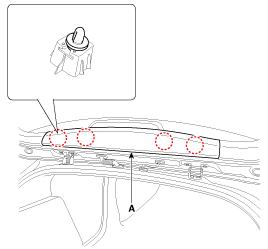
1. |
Using a screwdriver or remover, remove the tail gate upper trim
(A).
|
|
2. |
Install in the reverse order of removal.
|
ŌĆó |
Replace any damaged clips.
|
|
|
[Tail gate trim]
| ŌĆó
|
When prying with a flat-tip screwdriver, wrap it with
protective tape, and apply protective tape around the related
parts, to prevent damage.
|
| ŌĆó
|
Put on gloves to protect your hands.
|
|
|
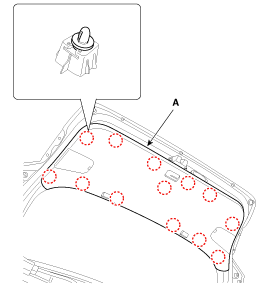
1. |
Using a screwdriver or remover, remove the tail gate trim (A).
|
|
2. |
Install in the reverse order of removal.
|
ŌĆó |
Replace any damaged clips.
|
|
|
[Tail gate side trim]
| ŌĆó
|
When prying with a flat-tip screwdriver, wrap it with
protective tape, and apply protective tape around the related
parts, to prevent damage.
|
| ŌĆó
|
Put on gloves to protect your hands.
|
|
|
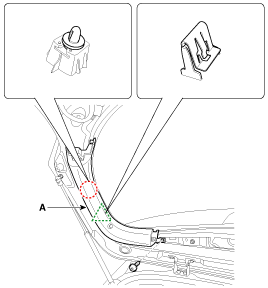
1. |
Remove the tail gate upper trim.
|
|
2. |
Remove the tail gate trim.
|
|
3. |
After loosening the mounting screw, then remove the tail gate
side trim (A).
|
|
4. |
Install in the reverse order of removal.
|
ŌĆó |
Replace any damaged clips.
|
|
|
(5Door)
1. Tail gate trim
...
(5Door)
1. Tail gate latch assembly
...
See also:
Adjustment
(4Door, 2Door)
1.
After loosening the trunk lid hinge (A) mounting bolt, adjust
the trunk lid by moving it up or down, or right or left.
2 ...
AGM Battery Cleaning
1.
Make sure the ignition switch and all accessories are in the OFF
position.
2.
Disconnect the battery cables (negative first).
...
Inside rearview mirror
Adjust the rearview mirror so that the center view through the rear window is
seen. Make this adjustment before you start driving.
Do not place objects in the rear seat which would interfere with yo ...


 Tail Gate Trim Component Location
 Tail Gate Latch Component Location