 Kia Forte: Seats

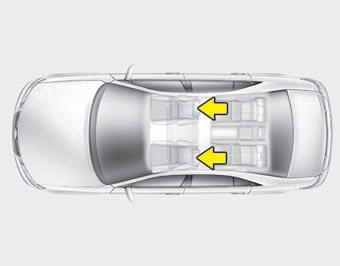
DriverŌĆÖs seat
(1) Seat adjustment, forward / backward
(2) Seatback recliner
(3) Seat adjustment, height (for driverŌĆÖs seat)
(4) Lumbar support (for driverŌĆÖs seat)
(5) Driver position memory system
(6) Headrest
(7) Walk-in seat (for 2 Door)
Front passengerŌĆÖs seat
(8) Seat adjustment, forward / backward
(9) Seatback recliner
(10) Headrest
(11) Walk-in seat (for 2 Door)
Rear seat
(12) Armrest
(13) Headrest
(14) Seatback folding lever (trunk, for 4 Door)
(14) Seatback folding lever (for 5 Door)
WARNING - Loose objects
Do not place anything in the driver's foot well or under the front seats. Loose objects in the driver's foot area could interfere with the operation of the foot pedals.
WARNING - Uprighting seat
Do not press the release lever on a manual seatback without holding and controlling the seatback. The seatback will spring upright possibly impacting you or other passengers.
WARNING - Driver responsibility for passengers
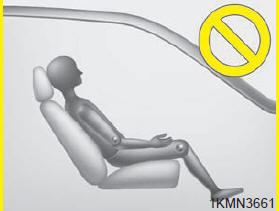
The driver must advise the passenger to keep the seatback in an upright position whenever the vehicle is in motion. If a seat is reclined during an accident, the restraint system's ability to restrain will be greatly reduced.
WARNING - Seat cushion
Occupants should never sit on seat cushions. The passenger's hips may slide under the lap portion of the seat belt during an accident or a sudden stop.
WARNING - DriverŌĆÖs seat
- Never attempt to adjust the seat while the vehicle is moving. This could result in loss of control of your vehicle.
- Do not allow anything to interfere with the normal position of the seatback. Storing items against a seatback or in any other way interfering with proper locking of a seatback could result in a serious or fatal injury in a sudden stop or collision.
- Sit as far back as possible from the steering wheel while still maintaining comfortable control of your vehicle. A distance of at least 10" from your chest to the steering wheel is recommended. Failure to do so could result in air bag inflation injuries to the driver.
WARNING - Seat adjustment
- Do not adjust the seat while wearing seat belts. Moving the seat forward will cause strong pressure on the abdomen.
- Do not place your hand near the seat bottom or seat track while adjusting the seat. Your hand could get caught in the seat mechanism.
Front seat adjustment - manual
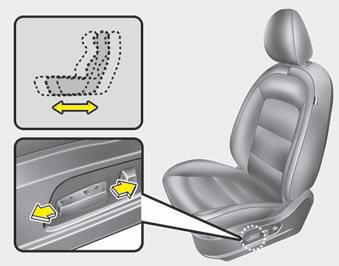
Forward and backward
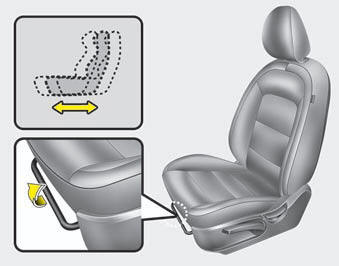
To move the seat forward or backward:
1. Pull the seat slide adjustment lever up and hold it.
2. Slide the seat to the position you desire.
3. Release the lever and make sure the seat is locked in place.
Adjust the seat before driving, and make sure the seat is locked securely by trying to move forward and backward without using the lever. If the seat moves, it is not locked properly.
WARNING - Unexpected seat movement
After adjusting a manual seat, always check that it is locked by shifting your weight to the front and back. Sudden or unexpected movement of the driver's seat could cause you to lose control of the vehicle.
Seatback angle
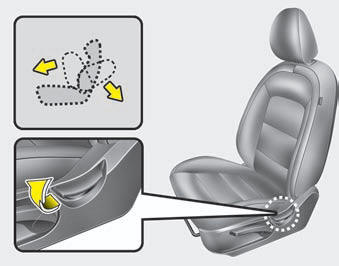
To recline the seatback:
1. Lean forward slightly and lift up the seatback recline lever.
2. Carefully lean back on the seat and adjust the seatback of the seat to the position you desire.
3. Release the lever and make sure the seatback is locked in place. (The lever MUST return to its original position for the seatback to lock.)
Seat Cushion height (for driver's seat)
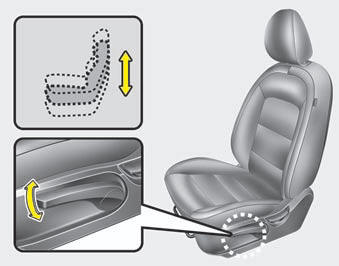
To change the height of the seat cushion push the lever upwards or downwards.
- To lower the seat cushion, push the lever down several times.
- To raise the seat cushion, push the lever up several times.
Lumbar support (for driverŌĆÖs seat)
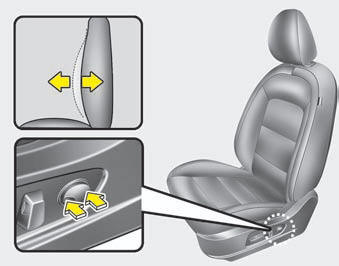
Press the front portion of the switch to increase support, or the rear portion of the switch to decrease support.
Front seat adjustment - power
The front seat can be adjusted by using the control switch located on the outside of the seat cushion.
Before driving, adjust the seat to the proper position so as to easily control the steering wheel, pedals and switches on the instrument panel.
WARNING
The power seat is operable with the ignition OFF. Therefore, children should never be left unatteded in the vehicle.
CAUTION
- The power seat is driven by an electric motor. Stop operating once the adjustment is completed. Excessive operation may damage the electrical equipment.
- When in operation, the power seat consumes a large amount of electrical power. To prevent unnecessary charging system drain, donŌĆÖt adjust the power seat longer than necessary while the engine is not running.
- Do not operate two or more power seat control switches at the same time. Doing so may result in power seat motor or electrical component malfunction.
Forward and backward
Push the control switch forward or backward to move the seat to the desired position. Release the switch once the seat reaches the desired position.
Seatback angle

Push the control switch forward or backward to move the seatback to the desired angle. Release the switch once the seat reaches the desired position.
Seat cushion height (for driver's side)
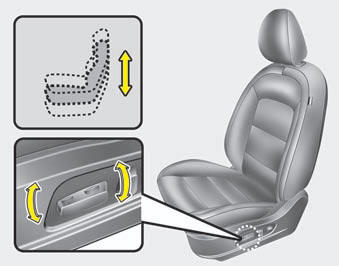
Pull the front portion of the control switch up to raise or down to lower the front part of the seat cushion. Pull the rear portion of the control switch up to raise or down to lower the rear part of the seat cushion. Release the switch once the seat reaches the desired position.
Lumbar support (for driverŌĆÖs seat, if equipped)

The lumbar support can be adjusted by pressing the lumbar support switch on the side of the driver's seat. Press the front portion of the switch to increase support, or the rear portion of the switch to decrease support.
Driver position memory system (if equipped, for power seat)
A driver position memory system is provided to store and recall the driver seat position with a simple button operation. By saving the desired position into the system memory, different drivers can reposition the driver seat based upon their driving preference.
If the battery is disconnected, the desired seat position memory will need to be re-saved.
WARNING
Never attempt to operate the driver position memory system while the vehicle is moving. This could result in loss of your vehicle, and an accident causing death, serious injury, or property damage.
Storing positions into memory using the buttons on the door
Storing driverŌĆÖs seat positions
1. Shift the shift lever into P while the ignition switch is ON.
2. Adjust the driver seat to position comfortable for the driver.
3. Press SET button on the control panel. The system will beep once.
4. Press one of the memory buttons (1 or 2) within 5 seconds after pressing the SET button. The system will beep twice when memory has been successfully stored.
Recalling positions from memory
1. Shift the shift lever into P while the ignition switch is ON.
2. To recall the position in memory, press the desired memory button (1 or 2). The system will beep once, then the driver seat will automatically adjust to the stored positions.
Adjusting the control switch for the driver seat while the system is recalling the stored position will cause the movement to stop and move in the direction that the control switch is moved.
Easy access function (if equipped)
With the shift lever in the P position, the system will move the driver's seat automatically as follows:
Without smart key system
- It will move the driverŌĆÖs seat rearward when the ignition key is removed and front driverŌĆÖs door is opened.
- It will move the driverŌĆÖs seat forward when the ignition key is inserted.
With smart key system
- It will move the driverŌĆÖs seat rearward when the engine start/stop button is turned to the OFF position and front driverŌĆÖs door is opened.
- It will move the driverŌĆÖs seat forward when the engine start/stop button is turned to the ACC or START position.
Headrest (for front seat)
The driver's and front passenger's seats are equipped with a headrest for the occupant's safety and comfort.
The headrest not only provides comfort for the driver and front passenger, but also helps protect the head and neck in the event of a collision.
of an accident, the headrest should be adjusted so the middle of the headrest is at the same height of the center of gravity of an occupant's head. Generally, the center of gravity of most people's head is similar with the height of the top of their eyes.
Also, adjust the headrest as close to your head as possible.
For this reason, the use of a cushion that holds the body away from the seatback is not recommended.
WARNING - Headrest removal/adjustment
- Do not operate the vehicle with the headrests removed. Headrests can provide critical neck and head support in a crash.
- Do not adjust the headrest height while the vehicle is in motion. Driver may lose control of the vehicle.
Adjusting the height up and down
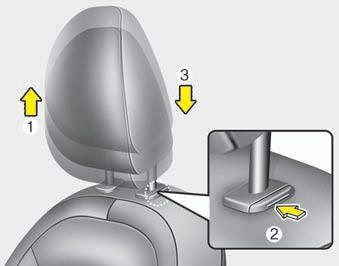
To raise the headrest, pull it up to the desired position (1). To lower the headrest, push and hold the release button (2) on the headrest support and lower the headrest to the desired position (3).
Removal and installation
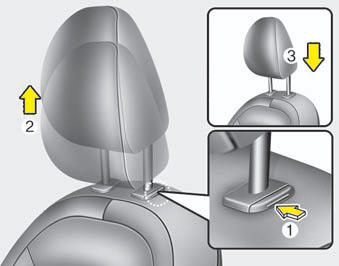
To remove the headrest, raise it as far as it can go then press the release button (1) while pulling the headrest up (2).
To reinstall the headrest, put the headrest poles (3) into the holes while pressing the release button (1). Then adjust it to the appropriate height.
Rear seat entry (for 2 door)
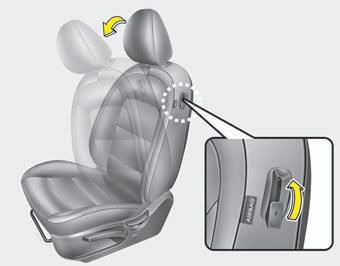
The driver and front passenger's seatback should be tilted to enter the rear seat.
By pulling up the walk-in seat lever (1) on the back of the driver and front passengerŌĆÖs seatback, the seatback will tilt forward.Then push the seat forward to allow the occupants to enter.
By pulling up the seatback, the seatback will recline and return to the original position.
WARNING
Never attempt to adjust the seat while the vehicle is moving or when the passenger's seat is occupied as the seat may suddenly move and injure the passenger.
Seatback pocket
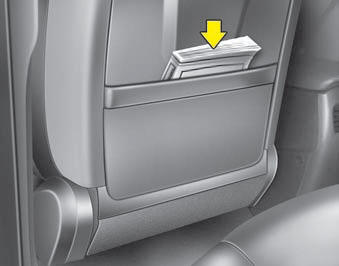
The seatback pocket is provided on the back of the front passengerŌĆÖs seatback.
WARNING - Seatback pocket
Do not put heavy or sharp objects in the seatback pocket. An occupant could contact such objects in a crash. Heavy objects in the front passenger seatback could also interfere with the air bag sensing system.

 Rear seat adjustment
Headrest (for rear seat)
The rear seat is equipped with headrests in all the seating positions for the
occupant's safety and comfort.
The headrest not only provides comfort for passengers, ...
See also:
Rear Seat Latch Component Location
(4Door, 2Door)
1. Rear seat latch assembly
(5Door)
1. Rear seat latch
...
Installation
1.
Remove the ignition key from the vehicle.
2.
Disconnect the battery negative cable and wait for at least thirty
seconds.
...
Climate control air filter
Filter inspection
The climate control air filter should be replaced according to the Maintenance
Schedule. If the vehicle is operated in severely air-polluted cities or on dusty
rough roads for a l ...
Categories
- Home
- Kia Forte BD 2019-2026 Owners Manual
- Kia Forte BD 2019-2026 Service Manual
- First Generation
- Second generation
- Kia Forte TD 2014-2018 Owners Manual
- Kia Forte TD 2014-2018 Service Manual
