 Kia Forte: Timing Chain Installation
Second generation YD (2014-2018) / Kia Forte TD 2014-2018 Service Manual / Engine Mechanical System / Timing System / Timing Chain Installation
| 1. |
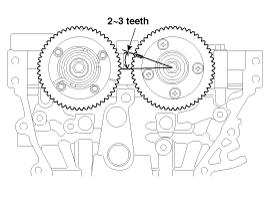
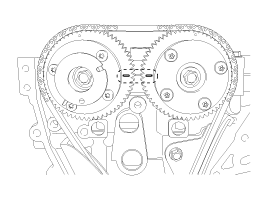
Check that the TDC marks on the intake and exhaust CVVT sprockets
are slightly turned (about 2 to 3 teeth) from the TDC position after
the timing chain has been removed.
|
| 2. |
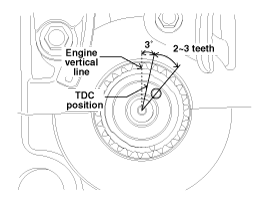
Turn the crankshaft about 2 to 3 teeth clockwise from the TDC
position (approx. 3┬░ clockwise from the engine vertical line), by the
same amount of rotation as the intake CVVT sprocket from the TDC position.
|
| 3. |
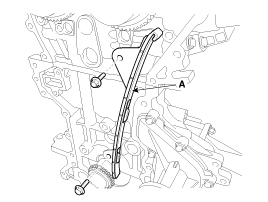
Install the timing chain guide (A).
|
| 4. |
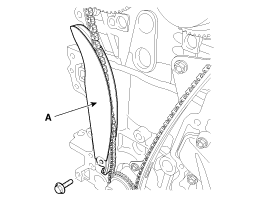
Install the timing chain tensioner arm (A).
|
| 5. |
Install the timing chain.
Crankshaft sprocket → Timing chain guide → Intake CVVT sprocket
→ Exhaust CVVT sprocket
|
| 6. |
Install the timing chain auto tensioner (A) and remove the stopper
pin (B).
|
| 7. |
After rotating crankshaft 2 revolutions in regular direction (clockwise
viewed from front), confirm that the TDC marks on the intake and exhaust
CVVT sprockets are aligned with the top surface of cylinder head.
|
| 8. |
Install the other parts in reverse order of removal.
|
|
 Timing Chain Inspection
Sprockets, Chain Tensioner, Chain Guide, Chain Tensioner Arm
1.
Check the CVVT sprocket and crankshaft sprocket for abnormal wear,
cracks, or damage. Replace if necessa ...
See also:
Ignition Coil Installation
1.
Install in the reverse order of removal.
Ignition coil installation bolts:
9.8 ~ 11.8 N.m (1.0 ~ 1.2 kgf.m, 7.2 ~ 8.7 Ib-ft)
...
Timing Chain Removal
1.
Remove the cylinder head cover.
(Refer to Cylinder Head Assembly - "Cylinder Head Cover")
2.
Set No.1 cylinder to TDC (Top ...
How vehicle audio works
AM and FM radio signals are broadcast from transmitter towers located around
your city. They are intercepted by the radio antenna on your vehicle. This signal
is then processed by the radio and ...
Copyright ® www.kifomanual.com 2014-2026

