 Kia Forte: Inside rearview mirror
Adjust the rearview mirror so that the center view through the rear window is seen. Make this adjustment before you start driving.
Do not place objects in the rear seat which would interfere with your vision through the rear window.
WARNING - Mirror adjustment
Do not adjust the rearview mirror while the vehicle is moving. This could result in loss of control.
Day/night rearview mirror (if equipped)
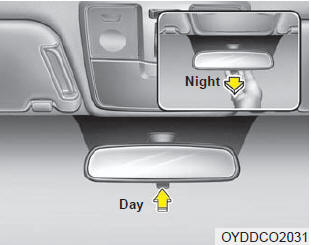
Make this adjustment before you start driving and while the day/night lever is in the day position.
Pull the day/night lever toward you to reduce the glare from the headlights of the vehicles behind you during night driving.
Remember that you lose some rearview clarity in the night position.
Electric chromic mirror with homelink® system (if equipped)
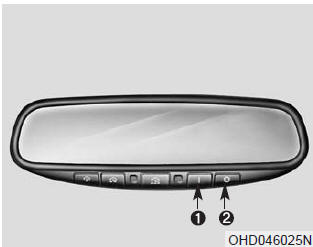
To operate the electric rearview mirror Press the I button (1) to turn the automatic- dimming function on. The mirror indicator light will illuminate.
Press the O button (2) to turn the automatic- dimming function off. The mirror indicator light will turn off.
* HomeLink® is a registered trademark of Johnson Controls, Inc.

HomeLink®* Wireless Control System
Your new mirror comes with an integrated Homelink® Universal Transceiver, which allows you to program the mirror to activate your garage door(s), estate gate, home lighting, etc. The mirror actually learns the codes from your various existing transmitters.
WARNING
- When programming the HomeLink® Wireless Control System, you may be operating a garage door or gate operator. Make sure that people and objects are out of the way of the moving door or gate to prevent potential harm or damage.
- Do not use HomeLink® with any garage door opener that lacks the safety stop and reverse feature as required by federal safety standards. (This includes any garage door opener model manufactured before April 1, 1982.) A garage door opener which cannot detect an object, signaling the door to stop and reverse, does not meet current federal safety standards. Using a garage door opener without these features increases risk of serious injury or death. For more information, call 1-800- 355-3515 or on the internet at www.homelink.com.
Retain the original transmitter for future programming procedures (i.e., new vehicle purchase). It is also suggested that upon the sale of the vehicle, the programmed Homelink® buttons be erased for security purposes (follow step 1 in the "Programming" portion of this text).
Programming
Your vehicle may require the ignition switch to be turned to the ACC position for programming and/or operation of Homelink®. It is also recommended that a new battery be replaced in the hand-held transmitter of the device being programmed to Homelink® for quicker training and accurate transmission of the radiofrequency.
Follow these steps to train your Homelink® mirror:
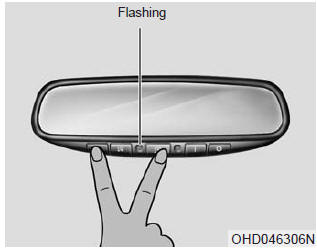
When programming the buttons for the first time, press and hold the left and
center buttons (

,

) simultaneously until the indicator light begins to flash after approximately 20
seconds. (This procedure erases the factory-set default codes. Do not perform this
step to program additional hand-held transmitters.)
✽ NOTICE
For non rolling code garage door openers, follow steps 2 - 3. For rolling code garage door openers, follow steps 2 - 6. For Canadian Programming, please follow the Canadian Programming section. For help with determining whether your garage is non-rolling code or rolling code, please refer to the garage door openers ownerŌĆÖs manual or contact Homelink┬« customer service at 1-800-355-3515.
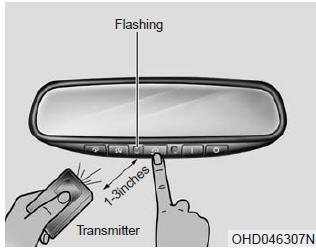
2.Press and hold the button on the Homelink® system you wish to train and the button on the transmitter while the transmitter is approximately 1 to 3 inches away from the mirror. Do not release the buttons until step 3 has been completed.
3.The Homelink® indicator light will flash, first slowly and then rapidly. When the indicator light flashes rapidly, both buttons may be released. (The rapid flashing light indicates successful programming of the new frequency signal.)
✽ NOTICE
Some gate operators and garage door openers may require you to replace step #3 with the "cycling" procedure noted in the "Canadian Programming" section of this document.
 Mirrors
...
 Rolling code programming
To train a garage door opener (or other rolling code equipped devices) with the
rolling code feature, follow these instructions after completing the "Programming"
portion of this text. (A ...
See also:
Climate Control Air Filter Description
The climate control air filter is located in the blower unit. It eliminates
foreign materials and odor. The particle filter performs a role as an odor filter
as well as a conventional dust fi ...
Components
...
Description
The Vehicle Information System is a Telematics service that ensures comfortable
and enjoyable driving by providing safety, security, and vehicle diagnostic
information, with the option of usi ...
Categories
- Home
- Kia Forte BD 2019-2026 Owners Manual
- Kia Forte BD 2019-2026 Service Manual
- First Generation
- Second generation
- Kia Forte TD 2014-2018 Owners Manual
- Kia Forte TD 2014-2018 Service Manual
