 Kia Forte: Auto Defogging Actuator Inspection
Second generation YD (2014-2018) / Kia Forte TD 2014-2018 Service Manual / Heating,Ventilation, Air Conditioning / Heater / Auto Defogging Actuator Inspection
| 1. |
Turn the ignition switch OFF.
|
| 2. |
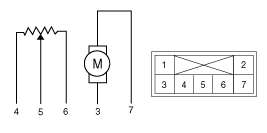
Disconnect the auto defogging connector.
|
| 3. |
Verify that the auto defogging actuator operates to the open position
when connecting 12V to the terminal 3 and grounding terminal 7.
Verify that the auto defogging actuator operates to the close
position when connecting in the reverse.
|
| 4. |
Connect the auto defogging actuator connector.
|
| 5. |
Turn the ignition switch ON.
|
| 6. |
Check the voltage between terminals 6 and 5.
Specification
It will feedback the current position of the actuator to the controls.
|
| 7. |
If the measured voltage is not within specification, substitute
with a known-good auto defogging actuator and check for proper operation.
|
| 8. |
Replace the auto defogging actuator if it is proved that there
is a problem with it.
|
 Mode Control Actuator Replacement
1.
Disconnect the negative (-) battery terminal.
2.
Remove the crash pad lower panel.
(Refer to Body -"Crash Pad Lower Panel") ...
 Auto Defogging Actuator Replacement
1.
Disconnect the negative (-) battery terminal.
2.
Remove the glove box housing.
(Refer to Body -"Glove Box Housing")
...
See also:
Water pump Components
1. Water pump pulley
2. Water pump
3. Water pump gasket
...
Speakers Installation
Front Speaker
1.
Install the front speaker.
2.
Install the front door trim.
Rear Speaker
1.
Install the ...
Categories
- Home
- Kia Forte BD 2019-2026 Owners Manual
- Kia Forte BD 2019-2026 Service Manual
- First Generation
- Second generation
- Kia Forte TD 2014-2018 Owners Manual
- Kia Forte TD 2014-2018 Service Manual

Copyright ® www.kifomanual.com 2014-2026