 Kia Forte: Timing Chain Cover Removal
Second generation YD (2014-2018) / Kia Forte TD 2014-2018 Service Manual / Engine Mechanical System / Timing System / Timing Chain Cover Removal
Engine removal is not required for this procedure.
|

Mark all wiring and hoses to avoid misconnection.
|

| 1. |
Disconnect the battery negative terminal.
|
| 2. |
Remove the RH front wheel.
|
| 3. |
Remove the RH under cover.
|
| 4. |
Remove the engine cover.
|
| 5. |
Remove the cylinder head cover.
(Refer to Cylinder Head Assembly ŌĆō ŌĆ£Cylinder Head CoverŌĆØ)
|
| 6. |
Drain engine oil and remove the oil pan.
(Refer to Lubrication system ŌĆō ŌĆ£Oil PanŌĆØ)
|
| 7. |
Remove the engine mounting bracket.
(Refer to Engine And Transaxle Assembly - "Engine Mounting")
|
| 8. |
Remove the crankshaft damper pulley.
(Refer to Timing System ŌĆō ŌĆ£Crankshaft Damper Pulley")
|
| 9. |
Remove the water pump.
(Refer to Cooling System - "Water pump")
|
| 10. |
Remove the A/C compressor.
(Refer to Heating,Ventilation, Air Conditioning - "Compressor")
|
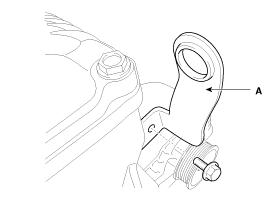
| 11. |
Remove the front engine hanger (A).
|
| 12. |
Remove the alternator.
(Refer to Engine Electrical System ŌĆō ŌĆ£AlternatorŌĆØ)
|
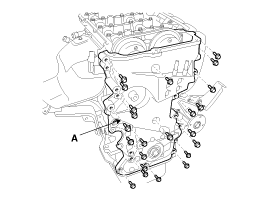
| 13. |
Remove the timing chain cover (A) by gently prying the gaps between
the cylinder head and cylinder block.
|

 Timing Chain Cover Components
1. Timing chain cover
2. Service plug bolt & gasket
...
 Timing Chain Cover Installation
1.
Install the timing chain cover.
(1)
Using a gasket scraper, remove all the old packing material
from the gasket surfaces.
...
See also:
Components
...
Specification
Item
Specification
Type
Hall sensor
Working voltage
6.5 ~1 5V
Output voltage
VL ≤ 0.5 V
(When output cu ...
Replacement
[Removal]
ŌĆó
Put on gloves to protect your hands.
...
Categories
- Home
- Kia Forte BD 2019-2026 Owners Manual
- Kia Forte BD 2019-2026 Service Manual
- First Generation
- Second generation
- Kia Forte TD 2014-2018 Owners Manual
- Kia Forte TD 2014-2018 Service Manual

Copyright ® www.kifomanual.com 2014-2026