 Kia Forte: Replacement
| ŌĆó
|
Put on gloves to protect your hands.
|
|
| ŌĆó
|
When prying with a flat-tip screwdriver, wrap it with
protective tape, and apply protective tape around the related
parts, to prevent damage.
|
| ŌĆó
|
Use a plastic panel removal tool to remove interior trim
pieces to protect from marring the surface.
|
| ŌĆó
|
Take care not to bend or scratch the trim and panels.
|
|
|
1. |
Remove the rear seat cushion assembly.
(Refer to Rear Seat - "Rear Seat Assembly")
|
|
2. |
Remove the rear seat back assembly.
(Refer to Rear Seat - "Rear Seat Assembly")
|
|
3. |
Remove the rear door scuff trim.
(Refer to Interior Trim - "Door Scuff Trim")
|
|
4. |
Remove the rear pillar trim.
(Refer to Interior Trim - "Rear Pillar Trim")
|
|
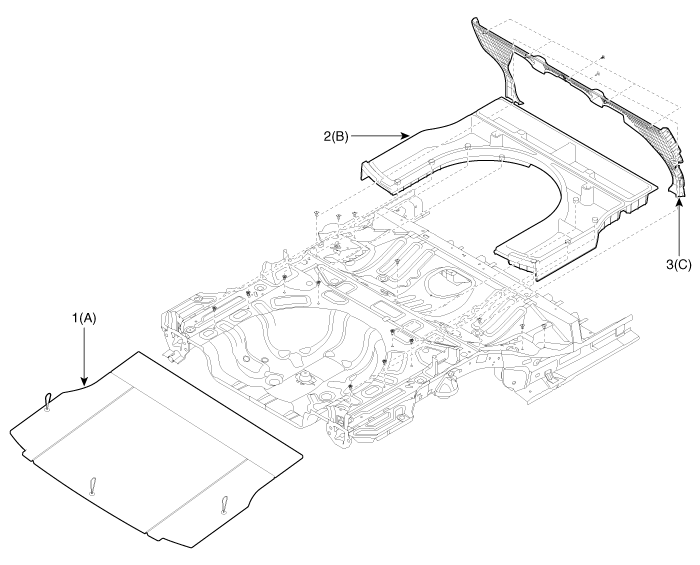
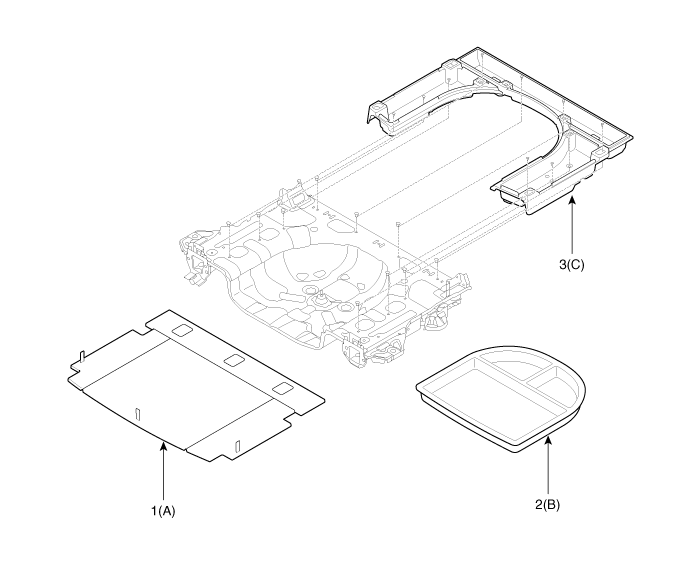
5. |
Remove the luggage covering mat (A).
|
|
6. |
After loosening the mounting screws and clips, then remove the
rear partition trim (B).
|
|
7. |
Using a screwdriver or remover, remove the rear wheel house trim
(C).
|
|
8. |
Using a clip remover, detach the clips, and remove the rear transverse
trim (D).
|
|
9. |
After loosening the mounting screws, then remove the luggage side
trim (E).
|
|
10. |
Install in the reverse order of removal.
|
ŌĆó |
Replace any damaged clips.
|
|
[Folding Seat Type]
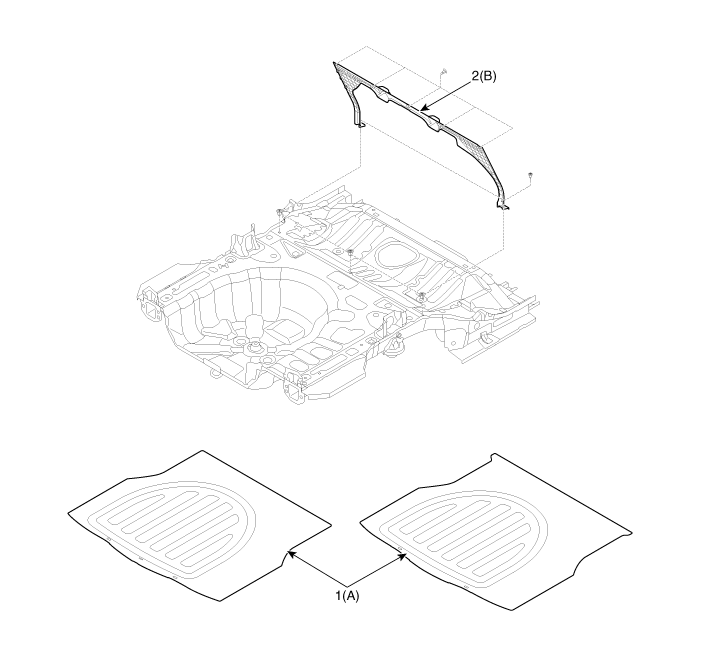
1. Luggage covering mat
|
2. Rear partition trim
|
[Fixed Seat Type]
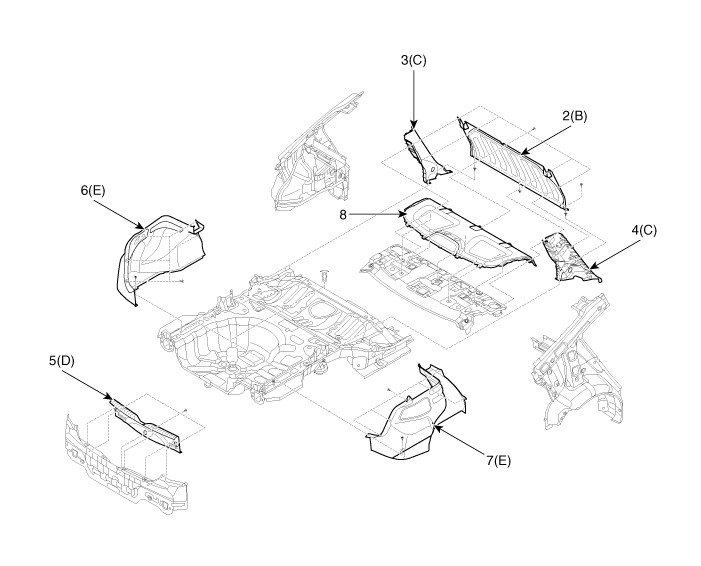
2. Rear partition trim
3. Rear wheel house trim [LH]
4. Rear wheel house trim [RH]
5. Rear transverse trim
|
6. Luggage side trim [LH]
7. Luggage side trim [RH]
8. Rear Package Tray Trim
|
|
(2Door)
[Tray option type]
| ŌĆó
|
Put on gloves to protect your hands.
|
|
| ŌĆó
|
When prying with a flat-tip screwdriver, wrap it with
protective tape, and apply protective tape around the related
parts, to prevent damage.
|
| ŌĆó
|
Use a plastic panel removal tool to remove interior trim
pieces to protect from marring the surface.
|
| ŌĆó
|
Take care not to bend or scratch the trim and panels.
|
|
|
1. |
Remove the luggage tray covering trim (A).
|
|
2. |
After loosening the mounting screws, then remove the luggage tray
center trim (B).
|
|
3. |
After loosening the mounting screws and clips, then remove the
partition side trim (C).
|
|
4. |
Install in the reverse order of removal.
|
ŌĆó |
Replace any damaged clips.
|
|
1. Luggage tray covering trim
2. Luggage tray center trim
|
3. Partition side trim
|
|
[General Type]
| ŌĆó
|
Put on gloves to protect your hands.
|
|
| ŌĆó
|
When prying with a flat-tip screwdriver, wrap it with
protective tape, and apply protective tape around the related
parts, to prevent damage.
|
| ŌĆó
|
Use a plastic panel removal tool to remove interior trim
pieces to protect from marring the surface.
|
| ŌĆó
|
Take care not to bend or scratch the trim and panels.
|
|
|
1. |
Remove the rear seat cushion assembly.
(Refer to Rear Seat - "Rear Seat Assembly")
|
|
2. |
Remove the rear seat back assembly.
(Refer to Rear Seat - "Rear Seat Assembly.")
|
|
3. |
Remove the rear inner outer trim.
(Refer to Interior Trim - " Center Pillar Trim")
|
|
4. |
After loosening the mounting screws and clips, then remove the
rear partition trim (A).
|
|
5. |
Remove the luggage covering mat (B).
|
|
6. |
Using a clip remover, detach the clips, and remove the rear transverse
trim (C).
|
|
7. |
After loosening the mounting screws, then remove the luggage side
trim (D).
|
|
8. |
Install in the reverse order of removal.
|
ŌĆó |
Replace any damaged clips.
|
|
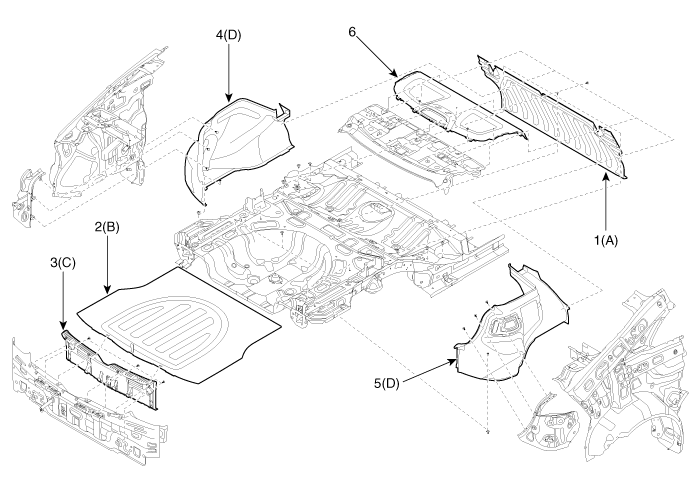
1. Rear partition trim
2. Luggage covering mat
3. Rear transverse trim
|
4. Luggage side trim [LH]
5. Luggage side trim [RH]
6. Rear pckage tray trim
|
|
(5Door)
[Tray option type]
| ŌĆó
|
Put on gloves to protect your hands.
|
|
| ŌĆó
|
When prying with a flat-tip screwdriver, wrap it with
protective tape, and apply protective tape around the related
parts, to prevent damage.
|
| ŌĆó
|
Use a plastic panel removal tool to remove interior trim
pieces to protect from marring the surface.
|
| ŌĆó
|
Take care not to bend or scratch the trim and panels.
|
|
|
1. |
Remove the luggage tray covering trim (A).
|
|
2. |
Remove the luggage center tray trim (B).
|
|
3. |
After loosening the mounting screws, then remove the luggage tray
side trim (C).
|
|
4. |
Install in the reverse order of removal.
|
ŌĆó |
Replace any damaged clips.
|
|
1. Luggage tray covering trim
2. Luggage center tray trim
|
3. Luggage tray side trim
|
|
[General Type]
| ŌĆó
|
Put on gloves to protect your hands.
|
|
| ŌĆó
|
When prying with a flat-tip screwdriver, wrap it with
protective tape, and apply protective tape around the related
parts, to prevent damage.
|
| ŌĆó
|
Use a plastic panel removal tool to remove interior trim
pieces to protect from marring the surface.
|
| ŌĆó
|
Take care not to bend or scratch the trim and panels.
|
|
|
1. |
Remove the rear seat cushion assembly.
(Refer to Rear Seat - "Rear Seat Assembly")
|
|
2. |
Remove the rear seat back assembly.
(Refer to Rear Seat - "Rear Seat Assembly")
|
|
3. |
Remove the rear door scuff trim.
(Refer to Interior Trim - "Door Scuff Trim")
|
|
4. |
After loosening the mounting bolts, then remove the rear shelf
side trim (A).
|
|
5. |
After loosening the mounting screw, then remove the rear wheel
house trim (B).
|
|
6. |
After loosening the mounting bolts, then remove the rear pillar
trim (C).
|
|
7. |
Remove the luggage covering trim (D).
|
|
8. |
Remove the clips, and then remove the rear transverse trim (E).
|
|
9. |
After loosening the mounting clips and screw, then remove the
luggage side trim (F).
|
|
10. |
Install in the reverse order of removal.
|
ŌĆó |
Replace any damaged clips.
|
|
1. Rear shelf side trim [LH]
2. Rear shelf side trim [RH]
3. Rear wheel house trim [LH]
4. Rear wheel house trim [RH]
5. Rear pillar trim [LH]
|
6. Rear pillar trim [RH]
7. Luggage covering trim
8. Rear transverse trim
9. Luggage side trim [LH]
10. Luggage side trim [RH]
|
11. Covering shelf trim
12. Fire extinguisher
13. Rear seat belt bracket [LH]
14. Rear seat belt bracket [RH]
|
|
See also:
ESC OFF Switch Description
1.
The ESC OFF switch is for the user to turn off the ESC system.
2.
The ESC OFF lamp is on when ESC OFF switch is engaged.
...
Cooling Fan Description
[Air conditioning type]
The cooling fan operates in 2 stages (HIGH/LOW). The engine control module
(ECM) controls the cooling fan according to the coolant temperature, vehicle
speed and A ...
PTC Heater Description
The PTC (Positive Temperature Coefficient) heater is installed at the
exit or the backside of the heater core.
The PTC heater is an electric heater using a PTC element as an auxiliary
hea ...


 Trunk Trim
 Windshield Glass