 Kia Forte: Installation
Second generation YD (2014-2018) / Kia Forte TD 2014-2018 Service Manual / Restraint / SRSCM / Side Impact Sensor (SIS) / Installation
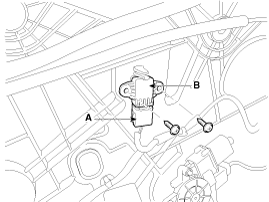
| Pressure Side Impact Sensor |
| 1. |
Install the new pressure side impact sensor with the screws (B)
then connect the pressure side impact sensor connector (A).
|

| 2. |
Install the front door trim.
(Refer to Body - "Front door trim")
|
| 3. |
Reconnect the battery negative cable.
|
| 4. |
After installing the pressure side impact sensor, confirm proper
system operation:
|
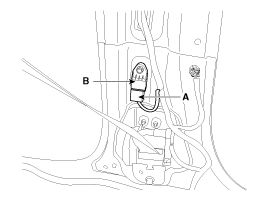
Side Impact Sensor
|
| 1. |
Install the new side impact sensor (B) with the bolt then connect
the side impact sensor connector (A).
|
| 2. |
Install the center pillar lower trim.
(Refer to Body - "Center pillar trim")
|
| 3. |
Install the door scuff trim.
(Refer to Body - "Door scuff trim")
|
| 4. |
Reconnect the battery negative cable.
|
| 5. |
After installing the Side Impact Sensor, confirm proper system
operation:
|
 Removal
Pressure Side Impact Sensor
ŌĆó
Removal of the airbag must be performed according ...
 Seat Belt Buckle Sensor (BS)
The SRSCM shall monitor the status of the driver and passenger seat belt
buckle. The SRSCM provides one pin each for the driver and passenger seat belt
buckle status input. The seat belt buck ...
See also:
Power Door Lock Relay Inspection
Diagnosis With GDS
1.
It will be able to diagnose defects of power door lock with GDS
quickly. GDS can operates actuator forcefully, input/output value monitoring
...
Power Mosfet Replacement
1.
Disconnect the negative (-) battery terminal.
2.
Disconnect the power mosfet connector (A) and then remove the
power mosfet (B) after lo ...
Auto Light Sensor Inspection
In the state of IGN1 ON, when multifunction switch module detects auto
light switch on, tail lamp relay output and head lamp low relay output are controlled
according to auto light sensor' ...
Categories
- Home
- Kia Forte BD 2019-2026 Owners Manual
- Kia Forte BD 2019-2026 Service Manual
- First Generation
- Second generation
- Kia Forte TD 2014-2018 Owners Manual
- Kia Forte TD 2014-2018 Service Manual

Copyright ® www.kifomanual.com 2014-2026