 Kia Forte: Main Crash Pad Assembly Replacement
Second generation YD (2014-2018) / Kia Forte TD 2014-2018 Service Manual / Body (Interior and Exterior) / Crash Pad / Main Crash Pad Assembly Replacement
|

|

| 1. |
Remove the front pillar trim.
(Refer to Interior Trim - "Front Pillar Trim")
|
| 2. |
Remove the cowl side trim.
(Refer to Interior Trim - "Cowl Side Trim")
|
| 3. |
Remove the instrument cluster.
(Refer to Body Electrical System - "Instrument Cluster")
|
| 4. |
Remove the crash pad upper panel.
(Refer to Crash Pad - "Crash Pad Upper Panel")
|
| 5. |
Remove the audio unit or AVN head unit.
(Refer to Body Electrical System - "Audio Unit")
(Refer to Body Electrical System - "AVN Head Unit")
|
| 6. |
Remove the heater A/C controller.
(Refer to Heating,Ventilation, Air Conditioning - "Heater & A/C
Control Unit (MANUAL)")
(Refer to Heating,Ventilation, Air Conditioning - "Heater & A/C
Control Unit (DATC)")
|
| 7. |
Remove the glove box housing.
(Refer to Crash Pad - "Glove Box Housing")
|
| 8. |
Remove the crash pad lower panel.
(Refer to Crash Pad - "Crash Pad Lower Panel")
|
| 9. |
Remove the steering column shroud lower panel.
(Refer to Crash Pad - "Steering Column Shroud Panel")
|
| 10. |
Remove the steering wheel.
(Refer to Steering System - "Steering Wheel")
|
| 11. |
Remove the multifunction switch assembly.
(Refer to Body Electrical System - "Multifunction Switch")
|
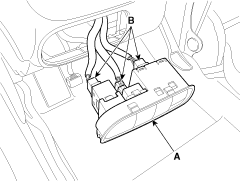
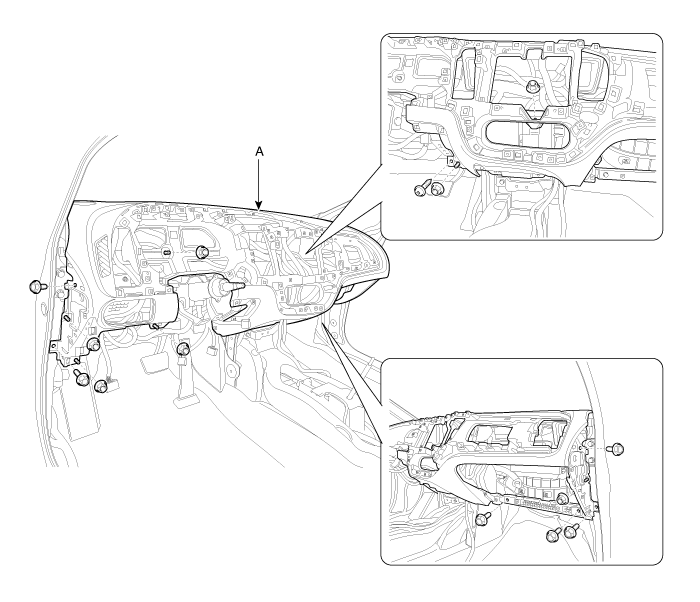
| 12. |
Using a screwdriver or remover, remove the crash pad lower switch
(A).
|
| 13. |
Disconnect the crash pad lower switch connectors (B).
|
| 14. |
Using a screwdriver or remover, remove the photo sensor (A).
|
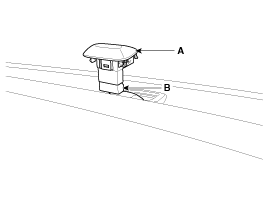
| 15. |
Disconnect the photo sensor connector (B).
|
| 16. |
Loosen the mounting bolts (A) and nut (B).
|
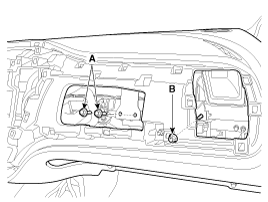
| 17. |
Disconnect the passenger's airbag connector (C).
|
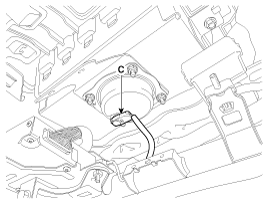
| 18. |
After loosening the mounting bolts, nuts, screw, then remove the
main crash pad assembly (A).
|
| 19. |
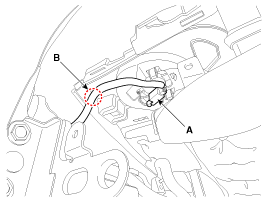
Right before removing the main crash pad, slightly lift the main
crash pad and remove the twitter speaker connector (A) and mounting
clip (B) located at the end of both side.
[LH]
[RH]
|

| 20. |
Install in the reverse order of removal.
|

 Main Crash Pad Assembly Component Location
1. Main crash pad assembly
...
 Cowl Cross Bar Assembly Component Location
1. Cowl cross bar assembly
...
See also:
Components
(4Door, 2Door)
1. Rear window glass
2. Rear window glass moulding
...
Cooling Fan Removal and Installation
Cooling fan assembly
1.
Disconnect the battery "-" terminal.
2.
Remove the air duct and air cleaner assembly.
(Refer to ...
Front Disc Brake
Components
1. Guide rod bolt
2. Bleed screw
3. Caliper carrier
4. Caliper body
5. Inner pad shim
6. Brake pad
7. Pad retainer
...
Categories
- Home
- Kia Forte BD 2019-2026 Owners Manual
- Kia Forte BD 2019-2026 Service Manual
- First Generation
- Second generation
- Kia Forte TD 2014-2018 Owners Manual
- Kia Forte TD 2014-2018 Service Manual

Copyright ® www.kifomanual.com 2014-2026