 Kia Forte: Trunk Lid Latch Replacement
| Х
|
Put on gloves to protect your hands.
|
|
| Х
|
When prying with a flat-tip screwdriver, wrap it with
protective tape, and apply protective tape around the related
parts, to prevent damage.
|
| Х
|
Take care not to scratch the body surface.
|
|
|
1. |
Remove the trunk lid trim.
(Refer to Trunk Lid - "Trunk Lid Trim")
|
|
2. |
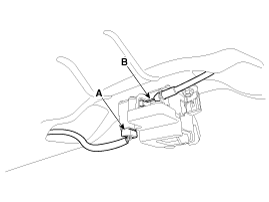
Disconnect the trunk lid latch connector (A) and remove the trunk
lid latch cable (B).

|
|
3. |
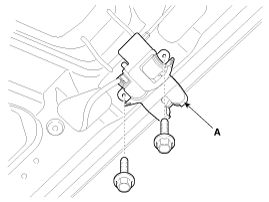
After loosening the mounting bolts, then remove the trunk lid
latch assembly (A).
Tightening torque :
6.9~10.8 N.m (0.7~1.1 kgf.m, 5.1~8.0 lb-ft)
|

|
|
4. |
Install in the reverse order of removal.
|
Х |
Make sure the trunk lid locks/unlocks and opens/closes
properly.
|
|
Х |
Adjust the trunk lid alignment.
|
|
Х |
Make sure the connectors are connected in properly.
|
|
|
(2Door)
| Х
|
Put on gloves to protect your hands.
|
|
| Х
|
When prying with a flat-tip screwdriver, wrap it with
protective tape, and apply protective tape around the related
parts, to prevent damage.
|
| Х
|
Take care not to scratch the body surface.
|
|
|
1. |
Remove the trunk lid trim.
(Refer to Trunk Lid - "Trunk Lid Trim")
|
|
2. |
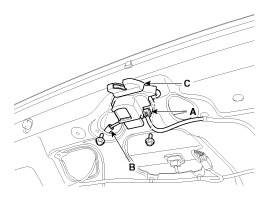
Disconnect the trunk lid latch connector (A) and remove the trunk
lid latch cable (B).
|
|
3. |
After loosening the mounting bolts, then remove the trunk lid
latch assembly (C).
Tightening torque :
6.9~10.8 N.m (0.7~1.1 kgf.m, 5.1~8.0 lb-ft)
|

|
|
4. |
Install in the reverse order of removal.
|
Х |
Make sure the trunk lid locks/unlocks and opens/closes
properly.
|
|
Х |
Adjust the trunk lid alignment.
|
|
Х |
Make sure the connectors are connected in properly.
|
|
|
(4Door)
1. Trunk lid latch assembly
(2Door)
1. Trunk lid latch assembly
...
(4Door, 2Door)
1.
Remove the trunk lid weatherstrip (A).
...
See also:
BJ Boot Components
1. BJ assembly
2. Circlip
3. BJ boot band
4. BJ boot
5. Dynamic damper band
6. Dynamic damper
7. Shaft
8. TJ boot band
9. TJ boot
10. Spider assembly
1 ...
Crankshaft Position Sensor (CKPS) Removal
1.
Turn the ignition switch OFF and disconnect the battery negative
(-) cable.
2.
Disconnect the crankshaft position sensor connector (A) ...
Immobilizer Control Unit Installation
1.
Install the immobilizer unit.
2.
Connector the immobilizer unit.
3.
Install the crash pad lower panel.
...
 Kia Forte: Trunk Lid Latch Replacement
 Trunk Lid Latch Component Location
 Trunk Lid Weatherstrip Replacement


