 Kia Forte: Front Door Trim Replacement
| •
|
Put on gloves to protect your hands.
|
|
| •
|
When prying with a flat-tip screwdriver, wrap it with
protective tape, and apply protective tape around the related
parts, to prevent damage.
|
| •
|
Be careful not to scratch the door trim and other parts.
|
|
|
1. |
Using a screwdriver or remover, remove the front door inside handle
cap (A).
|
|
2. |
Remove the front door pull handle cap (B).
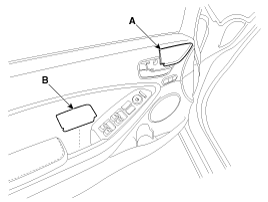
|
|
3. |
After loosening the mounting screws, then remove the front door
trim (A).
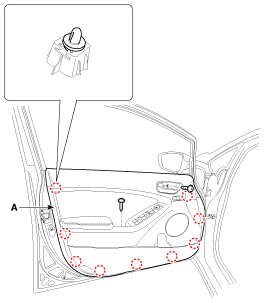
|
|
4. |
Remove the front door inside handle cage (A).
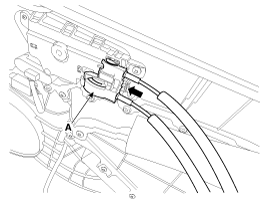
|
|
5. |
Disconnect the seat memory switch connecter (A), outside rear
view mirror switch connector (B), power window switch connector (C).
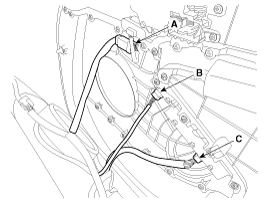
|
|
6. |
Install in the reverse order of removal.
|
• |
Make sure the connector is connected properly.
|
|
• |
Make sure the door locks/unlocks and opens/closes
properly.
|
|
• |
Replace any damaged clips.
|
|
|
(2Door)
| •
|
Put on gloves to protect your hands.
|
|
| •
|
When prying with a flat-tip screwdriver, wrap it with
protective tape, and apply protective tape around the related
parts, to prevent damage.
|
| •
|
Be careful not to scratch the door trim and other parts.
|
|
|
1. |
Using a screwdriver or remover, remove the front door quadrant
inner cover (A).
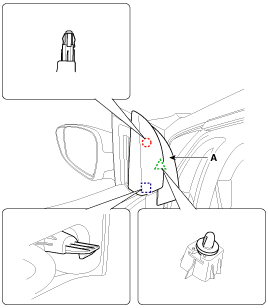
|
|
2. |
Using a screwdriver or remover, remove the front door inside handle
cap (A).
|
|
3. |
Remove the front door pull handle cap (B).
|
|
4. |
After loosening the mounting screws, then remove the front door
trim (A).
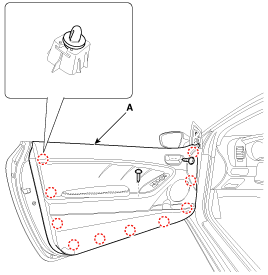
|
|
5. |
Remove the front door inside handle cage (A).
|
|
6. |
Disconnect the seat memory switch connecter (A), outside rear
view mirror switch connector (B), power window switch connector (C).
|
|
7. |
Install in the reverse order of removal.
|
• |
Make sure the connector is connected properly.
|
|
• |
Make sure the door locks/unlocks and opens/closes
properly.
|
|
• |
Replace any damaged clips.
|
|
|
(4Door, 5Door)
1. Front door trim
(2Door)
1. Front door trim
...
(4Door, 5Door, 2Door)
1.
Remove the front door trim.
(Refer to Front Door - "Front Door Trim")
2.
After loosenin ...
See also:
Installation
1.
Install in the reverse order of removal.
If the oil seal on the transaxle case side is da ...
Alternator Installation
1.
Install in the reverse order of removal.
2.
Adjust the alternator belt tension after installation.
(Refer to Engine Mechanical ...
Removal
1.
Separate the push rod (C) after remove the pin (A) and washer
(B).
2.
Remove the battery.
(Refer to Engine Electrical S ...



 Front Door Trim Component Location
 Front Door Inside Handle Replacement