 Kia Forte: Outside Rear View Mirror Replacement
| ŌĆó
|
Put on gloves to protect your hands.
|
|
| ŌĆó
|
When prying with a flat-tip screwdriver, wrap it with
protective tape, and apply protective tape around the related
parts, to prevent damage.
|
| ŌĆó
|
Take care not to scratch the body surface.
|
|
|
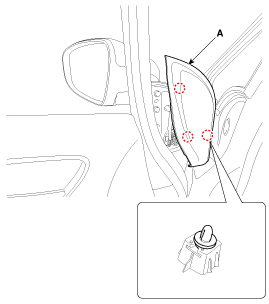
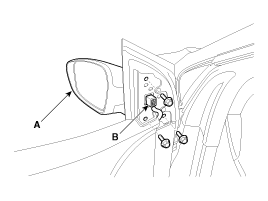
1. |
Using a screwdriver or remover, remove the front door quadrant
inner cover (A).
|
|
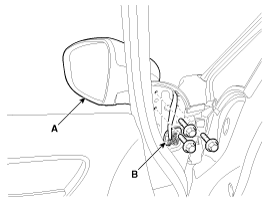
2. |
Disconnect the outside rear view mirror connector (B).
|
|
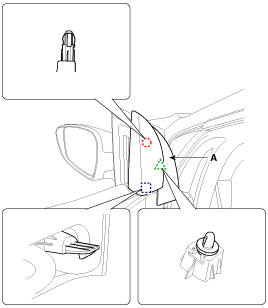
3. |
After loosening the mounting bolts, then remove the outside rear
view mirror (A).
Tightening torque :
6.9~10.8 N.m(0.7~1.1 kgf.m, 5.1~8.0 lb-ft)
|
|
|
4. |
Install in the reverse order of removal.
|
ŌĆó |
Make sure the connector is connected properly.
|
|
ŌĆó |
Replace any damaged clips.
|
|
|
(2Door)
| ŌĆó
|
Put on gloves to protect your hands.
|
|
| ŌĆó
|
When prying with a flat-tip screwdriver, wrap it with
protective tape, and apply protective tape around the related
parts, to prevent damage.
|
| ŌĆó
|
Take care not to scratch the body surface.
|
|
|
1. |
Using a screwdriver or remover, remove the front door quadrant
inner cover (A).
|
|
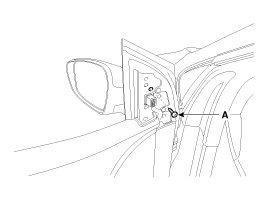
2. |
Loosen the outside rear view mirror mounting screw (A).
|
|
3. |
After loosening the mounting bolts, then remove the outside rear
view mirror (A).
|
|
4. |
Disconnect the outside rear view mirror connector (B).
Tightening torque :
6.9~10.8 N.m(0.7~1.1 kgf.m, 5.1~8.0 lb-ft)
|
|
|
5. |
Install in the reverse order of removal.
|
ŌĆó |
Make sure the connector is connected properly.
|
|
ŌĆó |
Replace any damaged clips.
|
|
|
(4Door, 5Door)
1. Outside rear view mirror
(2Door)
1. Outside rear view mirror
...
1. Inside rear view mirror
...
See also:
Start/Stop Button Removal
1.
Disconnect the negative (-) battery terminal.
2.
Using a screwdriver or remover, remove the center garnish [LH]
(A).
...
Thermostat Removal and Installation
Disassembly of the thermostat would have an adverse effect, causing
a lowering of cooling efficiency. Do not remove the ...
PTC Heater Inspection
Operating Logic Test (Manual only)
Inspect the PTC operation with the confirmation logic below :
1.
Entering
(1)
Set the Floor mode ...


 Outside Rear View Mirror Component Location
 Inside Rear View Mirror Component Location