 Kia Forte: Piston and Connecting Rod Reassembly
| ŌĆó
|
Thoroughly clean all parts to be assembled.
|
| ŌĆó
|
Before installing the parts, apply fresh engine oil to
all sliding and rotating surfaces.
|
|
|
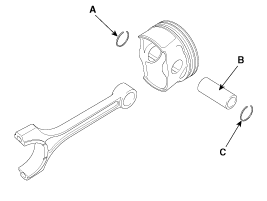
1. |
Assemble the piston and the connecting rod.
|
(1) |
Install the snap ring (A) in one side of the piston pin
hole.
|
|
(2) |
Align the piston front mark and the connecting rod front
mark.
|
|
(3) |
Insert the piston pin (B) into the piston pin hole and
the small end bore of connecting rod.
|
|
(4) |
Install the snap ring (C) in the other side after inserting
the piston pin.
|
|
Apply a sufficient amount of engine oil to outer surface
of the piston, inner surface of piston pin hole and small end
bore of the connecting rod before inserting the piston pin.
|
|
ŌĆó |
Be careful not to damage and scratch the small
end bore, piston pin hole and piston pin when inserting
the piston pin.
|
|
ŌĆó |
Set the snap ring firmly so that the snap ring
can contact with the whole groove of the piston pin
hole.
|
|
|
|
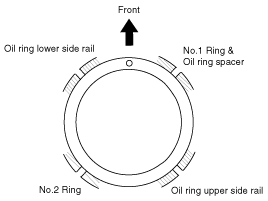
2. |
Install the piston rings.
|
(1) |
Install the oil ring spacer and 2 side rails by hand.
|
|
(2) |
Using a piston ring expander, install the 2 compression
rings with the maker mark facing upward.
|
|
(3) |
Position the piston rings so that the ring ends are as
shown. (The No.1 ring should be on the opposite side of the
No.2 ring.)
Example)
|
|
Check to ensure that the oil ring can be turned smoothly.
|
|
|
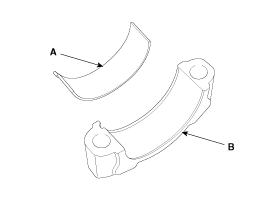
3. |
Install the connecting rod bearings.
|
(1) |
Align the bearing claw with the groove of the connecting
rod or connecting rod cap.
|
|
(2) |
Install the bearings (A) in the connecting rod and connecting
rod cap (B).
|
|
Be careful not to change the position of bearing caps.
|
|
|
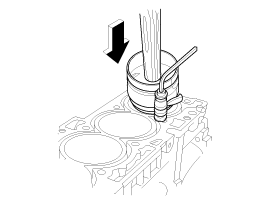
4. |
Install the piston and connecting rod assemblies.
| A. |
Before installing the piston, apply a coat of engine oil
to the ring grooves and cylinder bores.
|
| B. |
Install the piston and connecting rod assembly with the
front marks facing the front of the engine.
|
|
(1) |
Install the ring compressor, check that the rings are
securely in place, and then position the piston in the cylinder,
and tap it in using the wooden handle of a hammer.
|
|
(2) |
Stop after the ring compressor pops free, and check the
connecting rod-to-crank journal alignment before pushing the
piston into place.
|
|
(3) |
Apply engine oil to the bolt threads. Install the rod
caps with bearings, and tighten the bolts.
Tightening torque
1st step :
17.7 ~ 21.6 N.m (1.8 ~ 2.2 kgf.m, 13.0 ~ 15.9
lb-ft)
2nd step : 88 ~ 92┬░
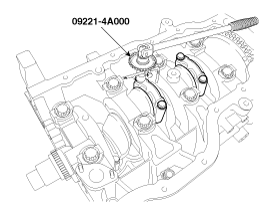
|
Using the SST (09221-4A000), tighten the connecting rod
cap bolts.
|
Always use new connecting rod cap bolts. Connecting
rod cap bolts are toque-to-yield bolts designed to be
permanently elongated beyond the state of elasticity
when torqued, so if the bolts are removed and reused,
it may cause the bolts to break or fail to maintain
clamping force.
|
|
Maintain downward force on the ring compressor
to prevent the rings from expending before entering
the cylinder bore.
|
|
|
|
5. |
Check the connecting rod end play.
|
|
6. |
Assemble the other parts in the reverse order of disassembly.
|
Connecting Rod
1.
Check the connecting rod side clearance.
Using a feeler gauge, measure the end play while moving the connecting
rod back and forth.
...
1. Crankshaft upper bearing
2. Crankshaft thrust bearing
3. Crankshaft
4. Crankshaft lower bearing
5. Crankshaft position sensor (CKPS) wheel
6. Lower crankcase
7. Gas ...
See also:
Compressor Description
The compressor is the power unit of the A/C system.
It is located on the side of engine block and driven by a V-belt of the
engine.
The compressor changes low pressure and low temperatur ...
Inspection (With GDS)
1.
Check BCM input/output specification of multifunction switch using
the GDS. If the specification is abnormal, replace the lamp or wiper
switch.
...
Release Residual Pressure in Fuel Line
There may be some residual pressure even after ŌĆ£Release Residual
Pressure in Fuel LineŌĆØ work, so cover the hose conn ...

 Piston and Connecting Rod Inspection
 Crankshaft Components