 Kia Forte: Rear Wheel House Trim Replacement
| ŌĆó
|
Put on gloves to protect your hands.
|
|
| ŌĆó
|
When prying with a flat-tip screwdriver, wrap it with
protective tape, and apply protective tape around the related
parts, to prevent damage.
|
| ŌĆó
|
Use a plastic panel removal tool to remove interior trim
pieces to protect from marring the surface.
|
| ŌĆó
|
Take care not to bend or scratch the trim and panels.
|
|
|
1. |
Remove the rear seat cushion assembly.
(Refer to Rear Seat - "Rear Seat Assembly")
|
|
2. |
Remove the rear seat back assembly.
(Refer to Rear Seat - "Rear Seat Assembly")
|
|
3. |
Remove the rear pillar trim.
(Refer to Interior Trim - "Rear Pillar Trim")
|
|
4. |
Remove the rear door scuff trim.
(Refer to Interior Trim - "Door Scuff Trim")
|
|
5. |
Slighty remove the rear door body side weatherstrip.
|
|
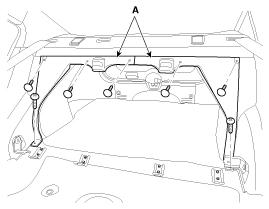
6. |
After loosening the mounting clips and screws, then remove the
rear partition trim (A).
|
|
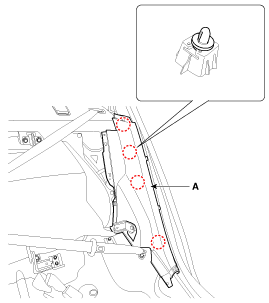
7. |
Using a screwdriver or remover, remove the rear wheel house trim
(A).
|
|
8. |
Install in the reverse order of removal.
|
ŌĆó |
Replace any damaged clips.
|
|
|
(5Door)
| ŌĆó
|
Put on gloves to protect your hands.
|
|
| ŌĆó
|
When prying with a flat-tip screwdriver, wrap it with
protective tape, and apply protective tape around the related
parts, to prevent damage.
|
| ŌĆó
|
Use a plastic panel removal tool to remove interior trim
pieces to protect from marring the surface.
|
| ŌĆó
|
Take care not to bend or scratch the trim and panels.
|
|
|
1. |
Remove the rear seat cushion assembly.
(Refer to Rear Seat - "Rear Seat Assembly")
|
|
2. |
Remove the rear seat back assembly.
(Refer to Rear Seat - "Rear Seat Assembly")
|
|
3. |
Remove the rear shelf side trim.
(Refer to Interior Trim - "Rear Shelf Side Trim")
|
|
4. |
Remove the rear door scuff trim.
(Refer to Interior Trim - "Door Scuff Trim")
|
|
5. |
Slighty remove the rear door body side weatherstrip.
|
|
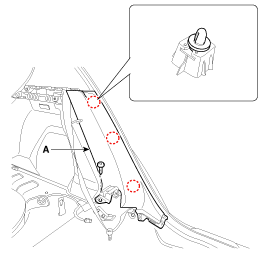
6. |
After loosening the mounting screw, then remove the rear wheel
house trim (A).
|
|
7. |
Install in the reverse order of removal.
|
ŌĆó |
Replace any damaged clips.
|
|
|
(4Door)
1. Rear wheel house trim
(5Door)
1. Rear wheel house trim
...
(4Door)
1. Rear package tray trim
(2Door)
1. Rear package tray trim
...
See also:
Starter Description
The starting system includes the battery, starter, solenoid switch, inhibitor
switch (A/T), ignition switch, ignition lock switch, connection wires and the
battery cable.
When the ignitio ...
Replacement
1.
Remove the air cleaner assembly.
(Refer to Engine Mechanical System - "Air Cleaner")
2.
Remove the battery and battery tray ...
Removal
1.
Disconnect the negative (-) battery terminal.
2.
Remove the crash pad lower panel.
(Refer to Body - "Crash Pad Low Panal")
...


 Rear Wheel House Trim Component Location
 Rear Package Tray Trim Component Location