 Kia Forte: Tail Gate Trim Replacement
| ŌĆó
|
When prying with a flat-tip screwdriver, wrap it with
protective tape, and apply protective tape around the related
parts, to prevent damage.
|
| ŌĆó
|
Put on gloves to protect your hands.
|
|
|
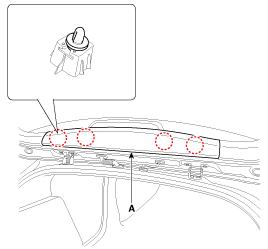
1. |
Using a screwdriver or remover, remove the tail gate upper trim
(A).
|
|
2. |
Install in the reverse order of removal.
|
ŌĆó |
Replace any damaged clips.
|
|
|
[Tail gate trim]
| ŌĆó
|
When prying with a flat-tip screwdriver, wrap it with
protective tape, and apply protective tape around the related
parts, to prevent damage.
|
| ŌĆó
|
Put on gloves to protect your hands.
|
|
|
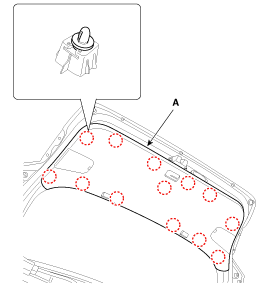
1. |
Using a screwdriver or remover, remove the tail gate trim (A).
|
|
2. |
Install in the reverse order of removal.
|
ŌĆó |
Replace any damaged clips.
|
|
|
[Tail gate side trim]
| ŌĆó
|
When prying with a flat-tip screwdriver, wrap it with
protective tape, and apply protective tape around the related
parts, to prevent damage.
|
| ŌĆó
|
Put on gloves to protect your hands.
|
|
|
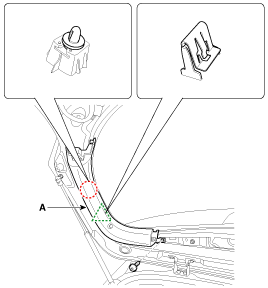
1. |
Remove the tail gate upper trim.
|
|
2. |
Remove the tail gate trim.
|
|
3. |
After loosening the mounting screw, then remove the tail gate
side trim (A).
|
|
4. |
Install in the reverse order of removal.
|
ŌĆó |
Replace any damaged clips.
|
|
|
(5Door)
1. Tail gate trim
...
(5Door)
1. Tail gate latch assembly
...
See also:
Installation
1.
Install in the reverse order of removal.
2.
Adjust the clutch switch.
(1)
Adjust the gab by rotating t ...
Schematic Diagram
Canister
The Canister is filled with charcoal and absorbs evaporated fuel vapor
from the fuel tank. The gathered fuel vapor in canister is drawn into the intake
manifold by the ECM/PC ...
Installation
1.
Fix the rear view camera with the rear view camera holder.
2.
Connect the rear view camera connector.
3.
Ins ...


 Tail Gate Trim Component Location
 Tail Gate Latch Component Location